• About
  • La Micaela Farm Shop

fincafood

~ culinary and horticultural life on a Spanish farm

Category Archives: Starters

Boquerones en Vinagre

25 Saturday Aug 2012

Posted by Nevenka in Fish, Food for One, Snacks and Tapas, Starters

≈ Leave a comment

boquerones_smelts……..or Smelts in Vinegar.  The word Smelt does not excite the imaginary palate in quite the same way as the word Boqueron. I assume its origin is from the word boca which translates as mouth and that Boqueron means a mouthful. And a delightful mouthful it is, whether dusted with flour and fried whole or marinated in vinegar as in this recipe which I was describing to my friend Andy while in France last week, and so it brought it to mind to share with you too.

This is regularly served as a tapa in Spanish bars. A couple of the fish will be presented atop a slice of fresh stick bread and sometimes with a good dollop of Allioli between the bread and the fish.

Cut the heads off your fresh smelts and open them out flat by opening along the belly and moving the flesh away from the bones on one side. There is no need at this point to remove the bones or the guts.

In a shallow dish that will take all the fish in one layer, pour enough white wine vinegar to cover the bottom of the dish. Lay the fish with the flesh side down into the vinegar.

Continue with all the fish putting them neatly side by side in the vinegar and then add more vinegar to just cover the layer of fish.

Put in the fridge for an hour so that the vinegar can ‘cook’ the fish.

Remove the fish one by one from the vinegar and remove the bones and guts. Lay in a clean dish.boquerones_en_vinagre

When you have done them all, pour over a generous amount of extra virgen olive oil and season the dish with finely chopped garlic and parsley. I added some chopped fresh green chillis as well, which are not traditional, but I like a bit of spice with my fish. Having a lime farm, and consequently having a lime or two lurking about, I have  used lime juice in place of the vinegar in this recipe which works very well and makes it more of a Ceviche, especially if you substitute fresh coriander for the parsley. Lemon juice should work too, although I haven’t tried it.

Put back in the fridge for half an hour or so for the flavours to develop and then serve with fresh bread.

Share this:

  • Share on X (Opens in new window) X
  • Share on Facebook (Opens in new window) Facebook
  • Share on WhatsApp (Opens in new window) WhatsApp
  • Email a link to a friend (Opens in new window) Email
Like Loading...

A Summer Lunch

06 Monday Aug 2012

Posted by Nevenka in Snacks and Tapas, Starters

≈ 2 Comments

The sultry summer heat dampens the appetites both for eating and for spending a lot of time preparing food. The mediterranean style of serving several little dishes of fresh and stimulating food is the way to go.

Fresh Figs with Serrano Ham

fresh_figs_with_serrano_ham

Pimientos Padrones Friedpimientos_pardones_fritos

Ensalada Murcianaensalada_murciana

Baby Squid Stuffed with Hazelnuts and Raisinsbaby_squid_stuffed_with_hazel_nuts_and_raisins

Prawn Frittersprawn_fritters_tortillitas_de_camarones

Sun Dried Tomato Pesto with Italian Crispbreadsun_dried_tomato_pesto

Here is the recipe for the Prawn Fritters or Tortillitas de Gambas.

The fame of these delicious fritters has spread from Cadiz where they originate, to the whole of Spain – and now beyond. Once you have tasted one you can see why. 

I first had them in Granada. It was the end of a warm June afternoon spent exploring the Albaicin, the old arab quarter of the city, the narrow streets dividing the beautiful houses full with the scent of orange blosssom and honeysuckle. We came across a rose draped square high up the hill with views out over the city and so installed ourselves outside a cafe with expectations of crisp cool white wine accompanied by a tasty local morsel.

The waiter brought us a list of the tapas available. When faced with such a list I always choose something that I have not tried before. So the toritillitas were ordered.

The ice cold wine arrived and shortly after the Tortillitas. Tiny shrimp still in their shells which add to the crispness of the fritters of light batter flavoured with garlic, onions and parsley. They arrive sizzling hot to your table.

Made with Camerones, a tiny brown shrimp found in the marshy coastline around Cadiz and Sanlucar de Barrameda, these are poor mans food turned  culinary delight. These shrimp do not find their way to the area of spain where I live very often and when they do I have to make the Tortillitas. In the meantime I use small peeled prawns, which are a good enough substitute.

The key ingredient in the batter is chickpea flour. Gram flour to Indians. It is the same flour as used in Onion Bahjis. Chickpea flour has a slightly sour taste to it which goes very well with fish, but its main attribute is that it crisps wonderfully when fried. Use it to coat fish or vegetables before frying. As a bonus it adds extra protein, but that is not why it is there.

As with all recipes, there is no one that is the definitive, and asking my Spanish friends for the best recipe for these fritters, each one gave me a different one. Some use all chickpea flour, some mix half and half chickpea and wheat flour, some swear by using only a coarse ground wheat flour called Recia. So after much experimentation, this is my favoured mix. The chickpea flour for crispness and sourness, the wheat flour for smoothness. The addition of chilli is not traditional, but I love a bit of spice with my fish.

For enough for 6 people

Chickpea flour –  60 gms

Wheat flour     –   40 gms

Shrimp or peel prawns   – 100 gms

Garlic very finely chopped  – 2 cloves

Parsley finely chopped – 1 tablespoon

Chilli finely chopped – to taste

Salt and freshly ground black pepper

water
150 – 180 ml

Oil for frying – either sunflower or olive

Mix all the dry ingredients together in a bowl. Add water to make a thin batter.

If you are not sure about the amount of water try frying a sample fritter.

Heat oil in a shallow frying pan to a depth of about 1 cm. When it is hot put in a tablespoonful of the batter. It should spread out into a thin fritter. If the batter is too thick to spread, then add more water to the mix.

Fry a few at a time on a brisk heat until crisp and light brown.

Serve immediately.

Share this:

  • Share on X (Opens in new window) X
  • Share on Facebook (Opens in new window) Facebook
  • Share on WhatsApp (Opens in new window) WhatsApp
  • Email a link to a friend (Opens in new window) Email
Like Loading...

Mediterranean Fish Soup with Rouille & Aliolli

19 Thursday Jul 2012

Posted by Nevenka in Fish, Starters

≈ Leave a comment

The promised fish soup recipe. The only specialist bit of equipment needed to make this is a Mouli for straining the soup. You can use a sieve but a Mouli makes it much less work and gets more of the flesh of the fish and hence more flavour into the soup. It is a very useful bit of equipment for all soups especially Gazpacho Andaluz and not expensive to furnish yourself with. I have found that the cheaper plastic ones, while not looking so smart hanging in the kitchen, actually work much better than the all metal.

For 8

The body and head of a skate, cut into 3 or 4 pieces

10 large prawns

4 cloves of garlic sliced

Half and onion sliced

Either 250 ml Passata – home made being best, or 250 ml Tomato Frito, or Standard sized tin of chopped plum tomatoes plus 3-4 tablespoons of tomato puree.

The cooking liquid from the skate wings from the previous post if you have done that.

Salt & Freshly ground black pepper

Peel the prawns and put the heads and skins in a pan with the cooking liquid from the skate wings if you have that, otherwise with enough water to cover. Bring to the boil and simmer for ten minutes.

Strain this stock and add to a large pan containing the pieces of skate body, the garlic, and the onion. Add more water to cover the ingredients and bring to the boil. Simmer for half an hour.

Let cool and strain through the coarse blade of the mouli making sure that you get as much of the fish flesh in the soup as you can. It will look a bit grey and unappetising at this point, but do not worry the tomatoes will transform it into a gorgeous red puree.

Return to the pan with whichever version of tomatoes that you are using and reheat. Cook for five minutes. Check seasoning. I have left this until this stage because some of the Passata and Tomato Frito in the shops has a high salt content so you can allow for this at this stage.

Add the chopped prawns to the soup and simmer a minute or two more. Serve with Rouille and Aliolli to stir in to taste.making_authentic_aliolli

I have given you already the recipe for Aloilli made like a mayonaise with eggs. This is  the simpler version using just garlic and olive oil. Put three cloves of garlic in the mortar with a good pinch of salt. Pound to a paste.

Have the olive oil at room temperature. Add a drizzle at a time, pounding well between the drizzles until you have a thick paste. For this condiment I added about 40 ml of oil as I wanted the garlic flavour to be strong, but for an eggless mayonaise keep adding the oil until you have a mayonaise consistency. You should be able to add about 150 ml of oil.aliolli_eggless

Rouille is a spicy condiment made with red chillis and seasonings, but you can easily substitute Harissa the Moroccan Chilli paste. I improvised mine by blending together some roasted red peppers from the freezer with fresh green chilli from the garden and a little olive oil and salt.

Share this:

  • Share on X (Opens in new window) X
  • Share on Facebook (Opens in new window) Facebook
  • Share on WhatsApp (Opens in new window) WhatsApp
  • Email a link to a friend (Opens in new window) Email
Like Loading...

Spring Planting Part 2 – Soil

12 Tuesday Jun 2012

Posted by Nevenka in Starters

≈ Leave a comment

Image

My farm is only 7 kilometers from the Mediterranean Sea, which climatically frees us from the extremes of temperatures that can exist inland, and gives us lovely sea breezes every afternoon. But for the land, the sea has left some unwelcome traces. At several times in the past, what is now my farm was seabed. Before the containing wall was built to stop corroding of the 6 metre high bank on the west boundary of the farm, one could see two distinct deposits of sea shells. These were separated by layers of alluvial silt.

So the soil is a heavy fine clay that becomes easily compacted and has areas with a high concentration of salt.

The salt is more of a problem than the clay. With the addition of lots of organic matter and some serious deep digging, the clay soil can be improved. There is always a problem with drainage and you learn fast not to try to do any work at all after a good amount of rain. I have been so stuck in the wet soil that it took two male friends and a rope to pull me out!

With a good amount of the irrigation water used here coming out of deep wells, this water generally contains some salt, add that to soil with salt residues and it limits the plants that you can cultivate. The technical experts in this area can tell at a glance the concentration of salt in the land by the wild plants that grow on it. When we bought the farm, our first plan was to plant vines and make wine, and with that in mind we built a beautiful wine cellar, but on analysing the soil and finding the levels of salts too high for vines we realised that this was a dream that would not become reality.

For growing vegetables one can pamper some small areas of the land, but for a big crop you have to go with what the land can support. Citrus will tolerate a small amount of salt in the land and the irrigation water, and olives will tolerate a slightly higher concentration. So we decided that for our main crop we would go with citrus, but as the farm is not so big at 7,000 square metres decided to plant limes which are not traditionally grown here. The price that small farmers in this region get for lemons and oranges is very low, so limes are a more profitable option.

Image

Today though, I want to talk about the pampering that you need to do to successfully grow organic vegetables in this harsh soil and climate.

The first, second and third things that you need to do are dig, dig and dig. Then you add lots of well rotted manure, ash from any bonfires and well rotted compost, and then you dig some more. Investing in a small rotavator helps hugely with the digging.

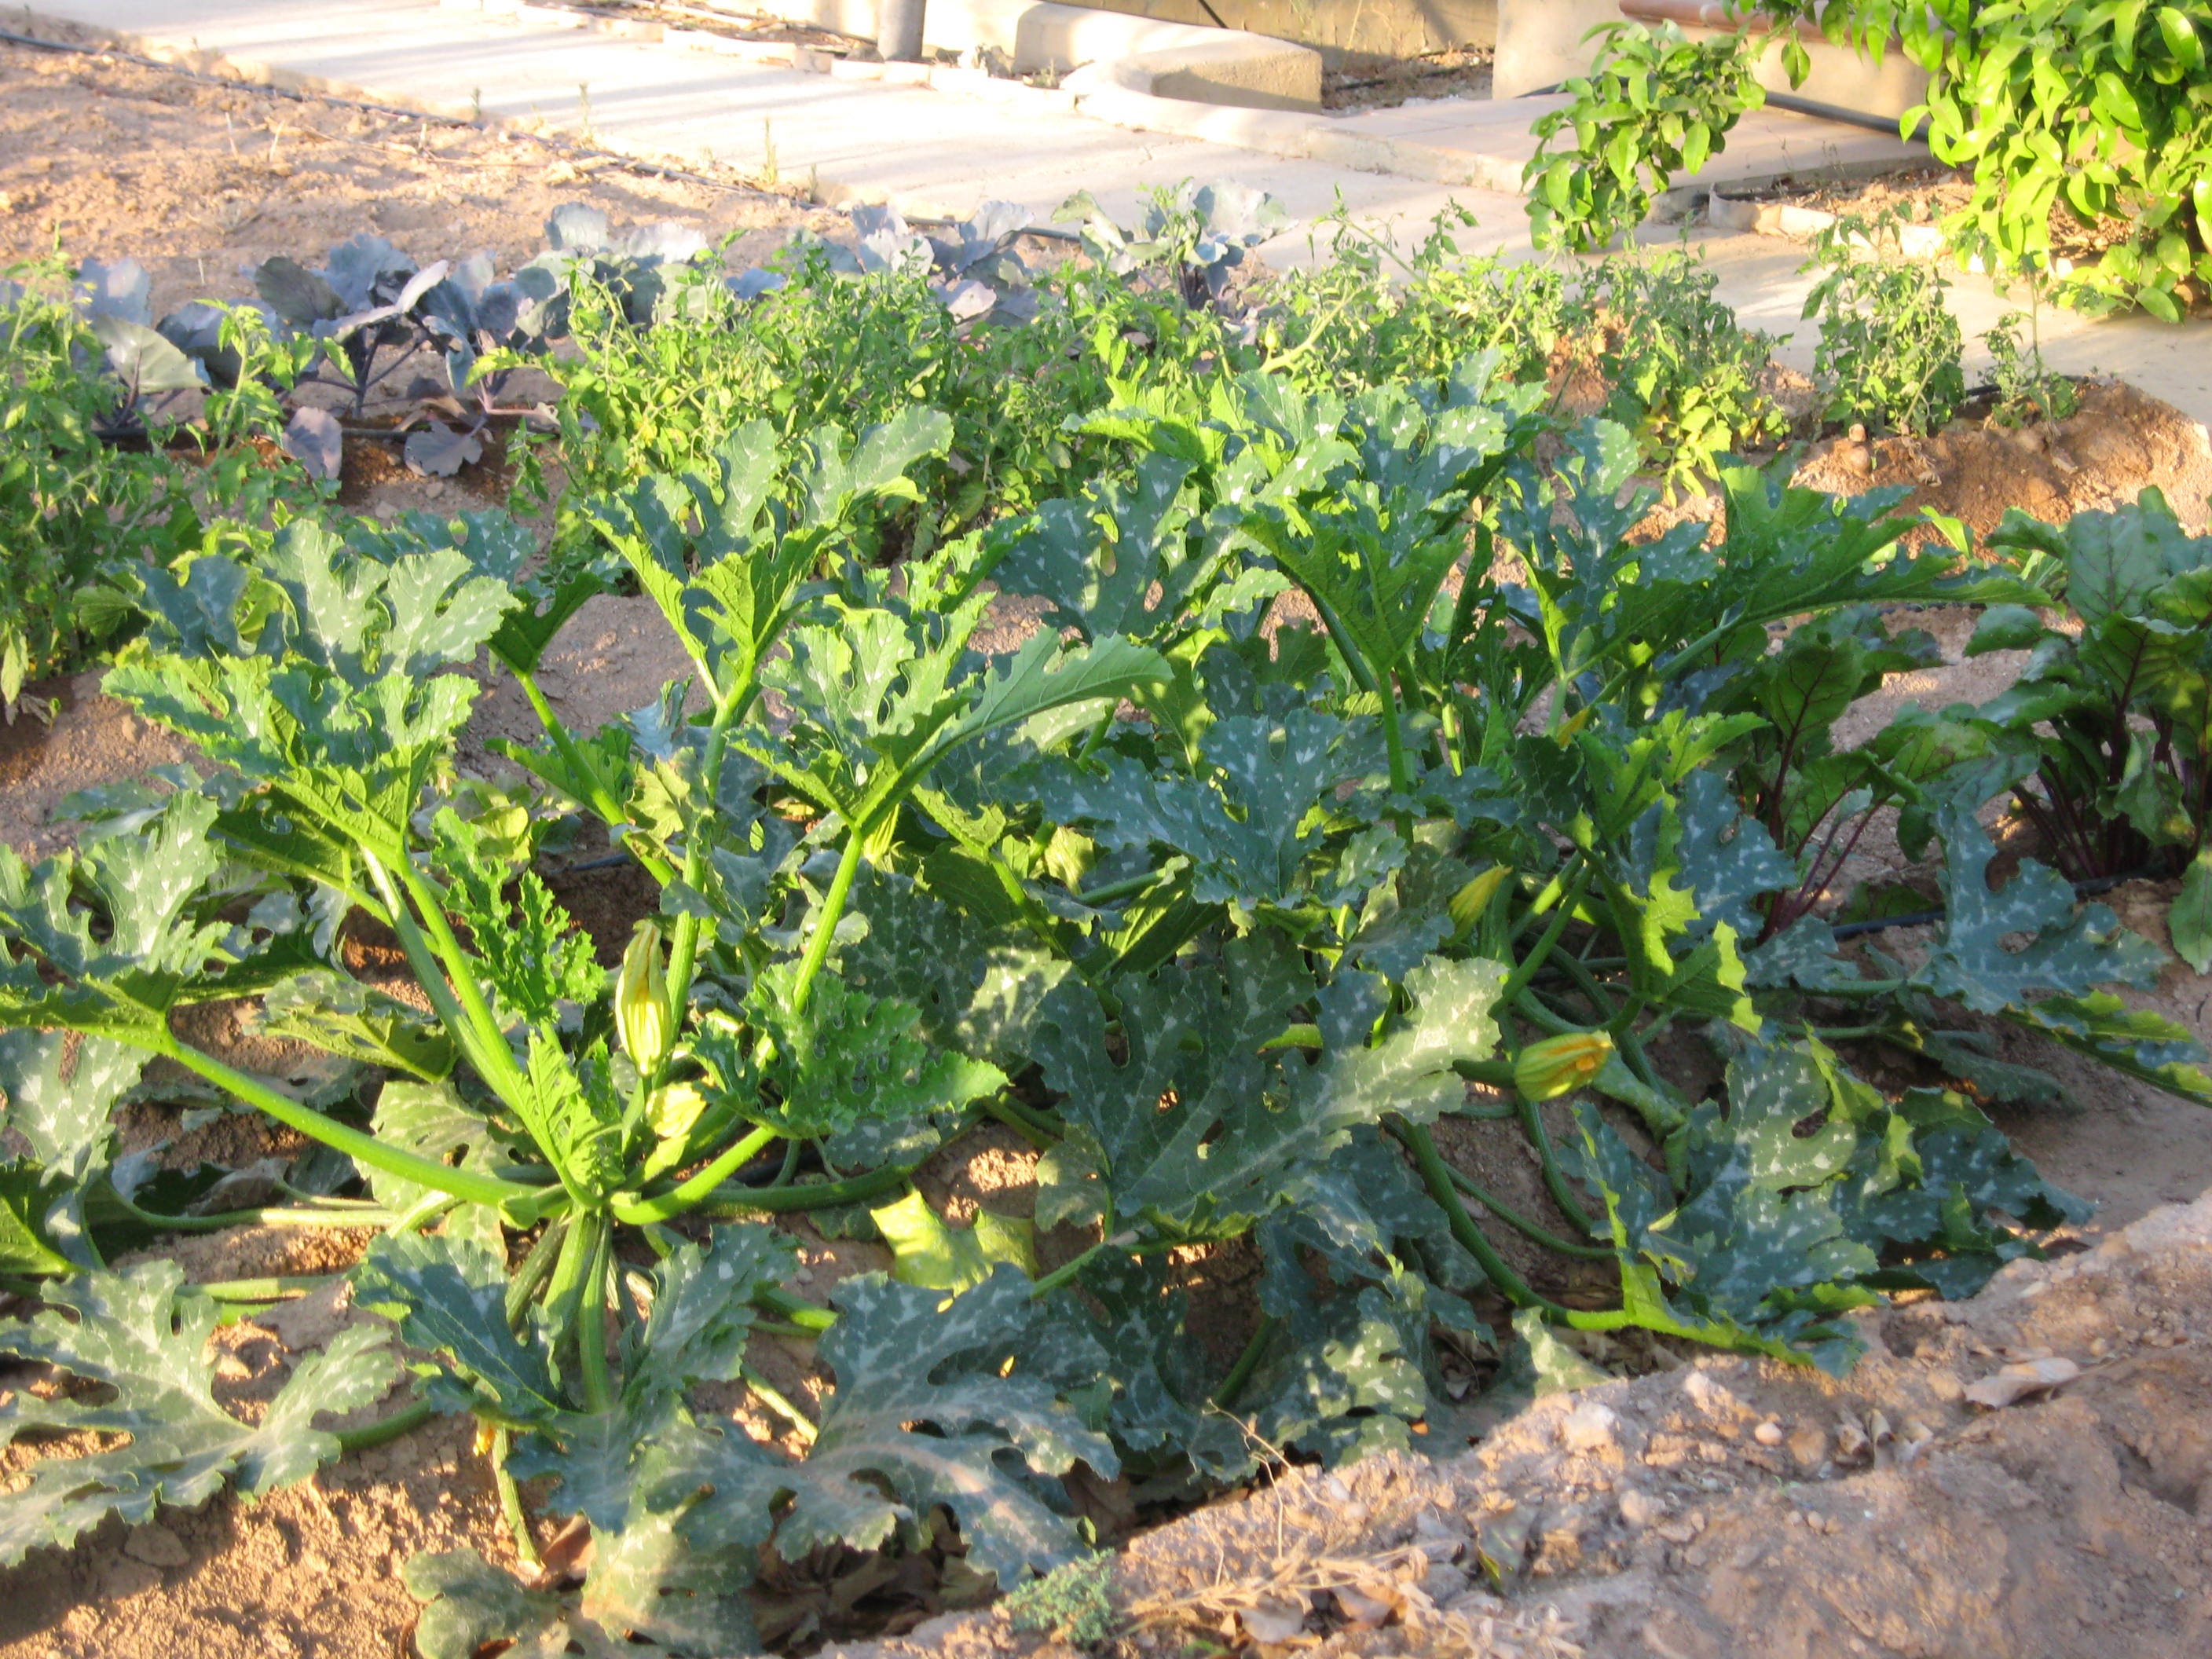
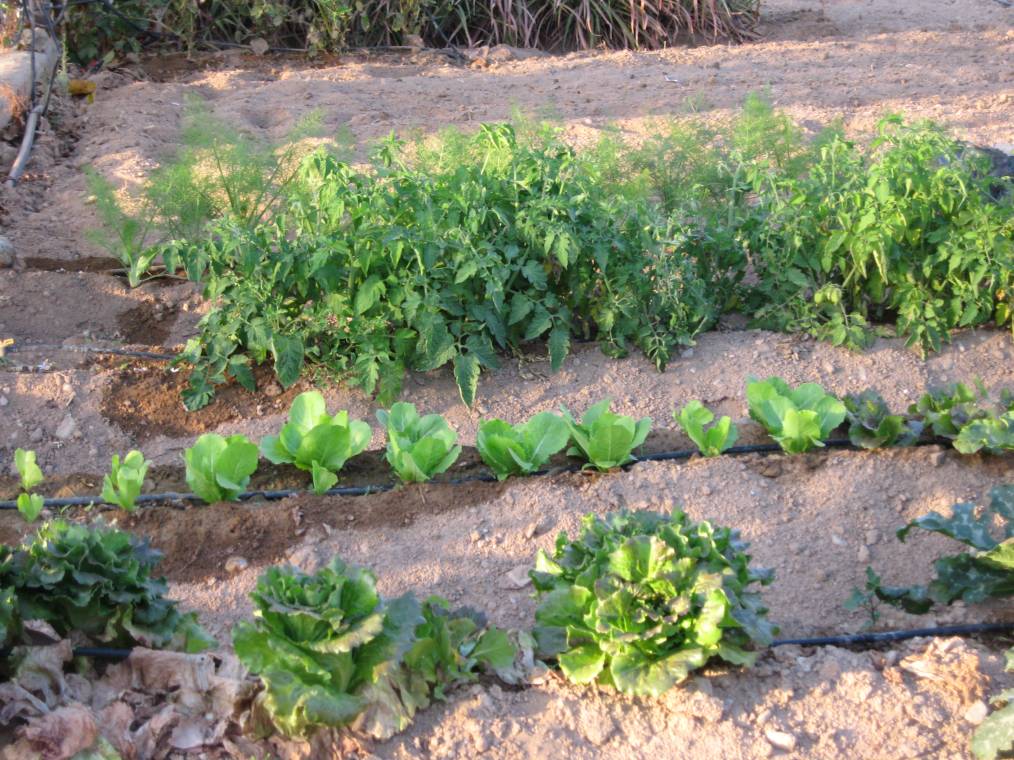
Before planting any vegetables the land has to be shaped into furrows with a v at the top along which will run the irrigation pipe. As I said in Spring Planting Part 1 – Water, everything in the garden here has to be irrigated. There are several reasons that the vegetables have to be grown in furrows apart from not wasting the irrigation water and they are all to do with the combination of soil and weather that we have. Image

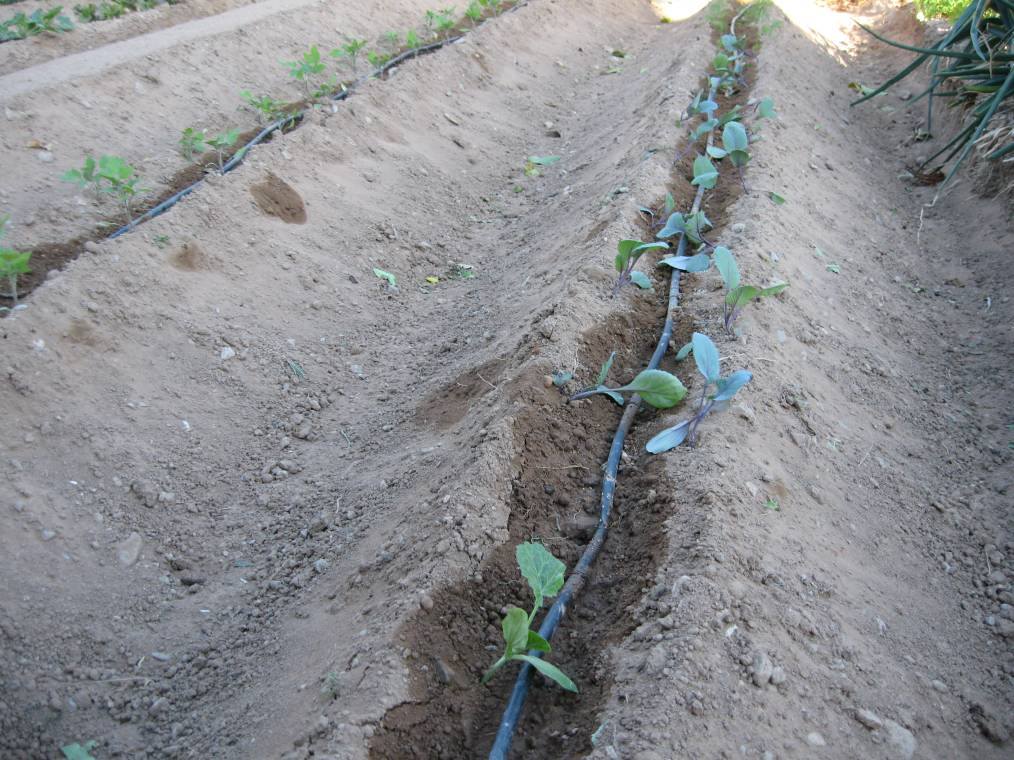
When we do get rain here, it often is a heavy deluge rather than light gentle rain. When this deluge beats down on the heavy clay soil it compacts it and sits on top of the soil, waterlogging it. Then, generally warm weather follows which quickly bakes the clay surface of the soil into a hard crust. If you had your plants in flat land, the soil would see-saw between being waterlogged which would rot the roots of the plant, to being dry and constricting on the roots. All plants need oxygen to be available to their roots, but if the soil is compacted and with a hard crust this denies the plant its oxygen.

So by putting your plants at the top of a furrow you are lifting them out of waterlogged ground and stopping the soil contracting around the roots of them. Also what rain there is collects in the valleys between the furrows and does not get dried by the sun as quickly as it would on flat land so continues to irrigate the plants for longer.

What makes it worth while to overcome the difficulties of the soil here, is the ability to grow vegetables all the year round. Although I have titled this spring planting, in reality I am sowing, planting and harvesting throughout the year. I grow different crops in each season.

In January and late August, potatoes go in, to be cropped in May and December respectively. March is the planting time for courgettes and summer tomatoes which have been started off in small pots in the greenhouse in February. Spring onions and beetroot are sown, and its the harvesting time for asparagus. In May the summer croppers go in. Peppers and chillis, all the squash family, aubergines, okra, purslane, lettuce leaved basil and edible loofahs. Almost all of these have been sown as seedlings in the greenhouse. The conditions here are so tough and the air so dry that seedlings have a very difficult time getting established, not to mention the number of super bugs that proliferate in a warm climate and are constantly looking for a tasty snack, so to give the vegetables the best chance of survival nearly all are started off in a protected environment. I mostly grow my own seedlings but there are lots of small enterprises here that deal in seedlings for the small grower, and the seedlings not at all expensive to buy. These are very useful when either you have had a failure with your own seedlings, usually through rot or greedy bugs eating them, or you have simply forgotten to sow the right thing at the right time.

Image

In august for autumn planting the seedlings are started off in a cool well shaded greenhouse away from the parching summer sun. These are all the plants that are associated with summer sowing in the north of europe. Purple sprouting broccoli – which will sprout the following march, all of the endive family, carrots, peas, beans, cabbages, florence fennel etc. 

In november the onion family go in, the leeks and onions having been started in the greenhouse about six weeks previously. And then the year will start again…….

Share this:

  • Share on X (Opens in new window) X
  • Share on Facebook (Opens in new window) Facebook
  • Share on WhatsApp (Opens in new window) WhatsApp
  • Email a link to a friend (Opens in new window) Email
Like Loading...

Mini Chicken Pstilla

07 Thursday Jun 2012

Posted by Nevenka in Snacks and Tapas, Starters

≈ 1 Comment

Tags

Obleas, Preserved Aubergine and Red Pepper Salad

I was invited to a lunch last week, and my contribution was to be the “amuse bouche”, a mouthful of something tasty to whet the appetite.  I had been reading one of Claudia Rodens books on middle eastern cooking the night before, and this inspired me to create a dish using the fruit, nut and spice combinations of that area. Also my dish had to be something quick and easy to prepare as the lunch invitation coincided with my day for opening my farm shop – click on the La Micaela Farm Shop at the top of the page for more details.

In the freezer I generally have packs of a local product – Obleas – which are little rounds of pastry a bit thicker than filo pastry. The traditional Spanish filling is a small amount of a thick stew made from fried peppers, garlic, tuna and tomatoes. The rounds are then folded in half to make a semi circle and sealed firmly on the joining edges, then the Empanaditas are deep fried until crisp.chicken_mini_pstilla

For lightness I prefer to brush the pastry circles with oil or butter, put the filling in the centre, fold the pastry upwards and pinch the edges together lightly, and then bake the little parcels. My favourite filling up to doing this one was of crumbly goats cheese and blanched spinach or chard bound together with egg.

MINI CHICKEN PSTILLAS

Filo pastry cut into 10cm squares or Obleas

100 gms cooked or raw lean chicken

small jar aubergine and red pepper salad – see Preserved Salads post for the recipe

50 gms toasted hazelnuts

50 gms golden raisins

a pinch or two of Ras el Hanout spices, or a mix of cumin, coriander, cinnamon and chilli all ground finely

Salt and pepper

olive oil for brushing the pastry

If you have not got cooked chicken and are starting with raw, cut it into small cubes and fry quickly in a small amount of olive oil. If using ready cooked chicken chop it into small cubes about half a centimetre square.

With a pestle and mortar crush the hazelnuts to break them up but not too small.

Put the chicken in a bowl with the nuts, salad and raisins. Season with the spices to taste.

If you have a tin for making miniature muffins or tarts it will be easier to form the little pies.

If you are using filo pastry and it is very thin you may well need to use two layers for your pies. Brush one side of a sheet of pastry with oil, lay another sheet on top and brush this with oil. Cut into squares of roughly 10 centimetres. Turn the two layers of pastry over so that the oily side is to the bottom and gently tuck the centre into one of the indentations in the muffin tin. With a teaspoon fill the pastry cup with the chicken filling. Lift the pastry around the pie and fold over the top of the filling to make a rough lid. Repeat this for each of your little pies.

If you don’t have a muffin tin, then use your hand as a rough cup, lay the pastry on your hand oily side down, put a teaspoon or so of filling in the middle and then bring the pastry up around the filling to cover it. Put the parcels on a baking tray to cook them. They may not look as neat and tidy as the ones cooked in a muffin or tart tray, and you may have the occasional burst, but they will taste just as good.

Cook in a preheated oven at 190 centigrade for 15 minutes or until golden brown and sizzling. Let cool a little before serving.

Share this:

  • Share on X (Opens in new window) X
  • Share on Facebook (Opens in new window) Facebook
  • Share on WhatsApp (Opens in new window) WhatsApp
  • Email a link to a friend (Opens in new window) Email
Like Loading...

Spring Salads

20 Sunday May 2012

Posted by Nevenka in Starters

≈ Leave a comment

I know that salads recipes are hardly ground breaking stuff but most of us eat salad on a regular if not daily basis, so here are some ideas to perk up your salad repetoire.

Mixed leaves, goats cheese, warm bacon pieces, walnuts, chives and their flowers.

Puntarelle which is a type of endive where you eat the flower shoots which resemble asparagus, tomatoes and anchovies.

Potato salad made the way my Dad made his and taught me.  New potatoes scraped and sliced, cooked al dente and then dressed while warm with lashings of extra virgen olive oil,  red wine vinegar and slivers of salad onions. Chive flowers to garnish.

A classic Salade Nicoise, but made with grilled fresh tuna, why have tinned when fresh tuna is available. Mixed leaves, tomato, lightly cooked french beans, soft boiled eggs, garlic and almond mayonaise.

Gorgonzola and walnuts atop blanched mange toute peas, grilled asparagus, grilled baby courgettes and their flowers, crunchy lettuce, tomatoes. Dressed with extra virgen olive oil and red wine vinegar.

Share this:

  • Share on X (Opens in new window) X
  • Share on Facebook (Opens in new window) Facebook
  • Share on WhatsApp (Opens in new window) WhatsApp
  • Email a link to a friend (Opens in new window) Email
Like Loading...

Fish Chowder

13 Sunday May 2012

Posted by Nevenka in Food for One, Main Courses, Starters

≈ 2 Comments

Tags

Chowder, Marrajo

The garden is so bursting with gorgeous vegetables that it is hard to decide what to cook with first. The potatoes that were planted in January are now all ready, and as there is little that is better than a freshly dug new organic potato, I think that they will have to be included in lunch. Yesterday we had them simply boiled with two dipping sauces. One a garlic mayonaise made with almonds in the place of the egg and the other spicy, a Mojo Picon from the Canary Islands made with picante smoked paprika, vinegar, garlic and olive oil.

But back to today. I love fish and being by the sea there is always a good selection of fresh fish. It is impossible to decide before arriving at the market exactly what will be the best fish on the day. Today I have chosen Marrajo. It is a meaty white fish, most likely from the same family as Swordfish and Shark. The skin is certainly siimilar to both of the above. There are several varieties of the above caught in the Mediterranean Sea, each of which have local names which can vary in places not really very far from one another. A fish can have one name here in the local fishing port of Garrucha, and another in Almeria City which is less than 100 km away.Image

So potatoes, fish, there is some home cured streaky bacon in the larder, fresh onions and some green asparagus. A creamy Fish Chowder will make a light lunch and is easy to cook for one.

FISH CHOWDER

Chowders hail from the Atlantic coast of the United States and are famously made in Maine with clams. There I am sure as many variations as there are cooks, but the elements that have to be included for it to class as a chowder are as follows. Bacon, potatoes, onions, milk or cream, fish or shellfish of some sort. You then add other vegetables depending on what you have and what is in season. Sweet corn being very american, fits extremely well. Peas, asparagus as I have included today, pumpkin or squash cut in small cubes, celeriac cut the same.

I like to use chicken stock as the main cooking liquid and then finish with a bit of cream to enrich the soup, but you can use just milk in place of the stock.Image

Per person

Olive oil

A quarter of an Onion – cut into dice

75 gms Streaky bacon cut into lardons

100-150 gms meaty white fish – I used a type of shark called Marrajo

100 gms potatoes – peeled and cut into dice about 1.5 cm square

150 ml approx chicken stock

6 stems of asparagus

2-3 tablespoons thick fresh cream

salt and pepper

Fresh flat leaved parsley

Blanch the potatoes. Put the cubes in a saucepan with salted water and bring to the boil. Simmer 1 minute and immediately drain.

Warm the olive oil in a shallow saucepan, add the onions and let cook slowly for a couple of minutes until translucent.

Add the bacon and fry for 7-10 minutes stirring from time to time.

Add the stock and the potatoes. Bring to a simmer and cook slowly for another 7-10 minutes until the potatoes are almost done.

Add the fish cut into cubes and the asparagus cut into bite sized pieces.

Cook slowly a few more minutes until the fish is just cooked.

Add salt and pepper and then the cream. As soon as the cream is amalgamated and warm, sprinkle over the freshly chopped parsley and serve.

Share this:

  • Share on X (Opens in new window) X
  • Share on Facebook (Opens in new window) Facebook
  • Share on WhatsApp (Opens in new window) WhatsApp
  • Email a link to a friend (Opens in new window) Email
Like Loading...

Loquats or Nispero

08 Tuesday May 2012

Posted by Nevenka in Starters

≈ 4 Comments

Eriobotryia japonica – Loquat in English which comes directly from the Chinese word – or Nispero Japonica in Spanish, nispero being a Japanese word meaning “wooly bunch” as the underside of the leaves have a soft white coating. It is an attractive evergreen tree with large deep green and shiny leaves, musky scented flowers and at this time of the year a profusion of golden fruits. It is also the first stone fruit to ripen after the winter, and for all these reasons it is much planted in here in southern spain.  It is a native of China despite acquiring the japonica in its name, and must have spread to Japan first before slowly making its way to Europe by the late 1700’s. It grows extremely well in the warmer parts of spain especially the Alicante and Almeria provinces.

There are two varieties in my garden, Algerie an early variety that has very sweet yellow fruit which are eaten fresh – these have already all been consumed before the later variety is ready. The fruit on the later variety, Tanaka, is bigger and a bright orange colour and more tart, so is better cooked. Also all the fruit is ready at once and does not keep longer than a day or two so preserving most of it of it is essential. It can be made into a jam, although I think the delicate flavour of the fruit gets lost in the amount of sugar need to preserve it. Also, and this is going to sound contradictory, it makes a good indian style chutney with garlic, chilli, vinegar, spices and sugar. When you have a glut of fruit it is worth sacrificing the delicate flavour to use the tartness and colour in a chutney.

As you can surmise from the photo  birds are rather partial to Nisperos as well as us, so the trees have to be netted before the fruits start to turn yellow,although I have had less of a problem with birds this year as there are currently two cats and two kittens in the household.Loquat TreeThe kittens however can pose a problem themselves…….

Most of my Nisperos get the following treatment to keep them. They are cooked, peeled and stoned and then frozen in portions with their juice. They can then be defrosted as needed to use  in desserts and sauces or just eaten as they are. They are full of vitamins but little sugar so one can feel free to eat a lot of them. One of my favourite recipes in the summer is Nispero Gazpacho which follows, but firstly how to deal with the fruit.

When you pick the fruit, cut the stems rather than break off the fruit as any wound to the fruit will discolour quite quickly. Wash the fruit.

Bring a large pan of water to the boil and then gently put in the Nispero a few at a time. If you have a lot of Nipero cook them in batches so that they come back to the boil fairly rapidly. Bring back to the boil and simmer for five minutes to cook them through to their cores. If they are very large cook an extra minute to be on the safe side.

Take the fruit out of the water and put into plenty of cold water to cool them down rapidly and stop them continuing to cook.

When cool enough, peel them, cut in halves and remove the stems, stones and the inner membrane. They are then ready to use or freeze.

Nispero GazpachoChilled Loquat Summer Soup

per person

half a clove of garlic

pinch of sea salt

10 nisperos prepared as above

1 tablespoon olive oil – good fruity extra virgen

Put the garlic and salt in a blender or food processor and blitz until chopped.

Add the nispero and olive oil and blend until you have a smooth creamy soup. Check seasonings and add more salt or oil if you think it is needed.

This soup is so refreshing on a hot summers day and can be made with other fruits. Cherries when in season work very well, there is no need to blanch them just cut them fresh into the blender. The same with water melon which when blended with olive oil turns a lovely coral colour.

If you have enjoyed reading this post then click on the “follow” button at the top  or bottom of the page, enter your e-mail address and you will automatically be notified when I publish a new post. Nevenka x

Share this:

  • Share on X (Opens in new window) X
  • Share on Facebook (Opens in new window) Facebook
  • Share on WhatsApp (Opens in new window) WhatsApp
  • Email a link to a friend (Opens in new window) Email
Like Loading...

Broad Bean Risotto

04 Friday May 2012

Posted by Nevenka in Main Courses, Starters

≈ 1 Comment

While I have been away on my travels the vegetable garden has been very busy and is overflowing with Mange-toute Peas, Broad Beans, Asparagus and Loquats amongst other things. I will talk about the Loquats later. Lets talk about broad beans today.

Normally I pick the beans when they are small and very tender, but of course in my absence they have matured into big beans. Still very useable, but they just need a bit more work to remove the skin from each individual bean once they have been removed from their pods.

BROAD BEAN RISOTTO 

Per person-

beans – shelled and skin removed if tough – 80 gms

risotto rice – 30 gms

butter – 15 gms

onion – finely chopped – 1 tbsp

raw ham – parma,  serrano, bayonne – 40 gms

light stock – 150-200 ml

white wine – 40 ml

sea salt and freshly ground black pepper

If you grow your own beans then this dish is ideal if you have a mixture of small tender beans and more mature ones with floury flesh. If this is the case then prepare the beans separately.

The small tender ones just want to go into a saucepan with a little of the butter. Put them on a low heat and swirl around until they are bright green. Add a small amount of water to go half the way up the beans, cover and cook for a couple of minutes until half cooked. Remove from the pan and put to one side until later.

The large beans will need their skin removed from each individual bean, then treat in the same way as the tender ones, but cook a little longer until they are  mashable. Mash them into a rough pulp with their cooking liquid. They don’t want to be a smooth puree, this is a rustic dish after all.

If you only have large beans then cook them all together as above but now divide them in two and mash half. Put them separately to one side until later.

Fry the onion in butter until transparent. Add the ham cut into small strips, stir and cook for a minute.

Add the rice and stir to coat in the butter. Cook for a minute or two for the rice to absorb the butter a little.

Pour in the wine and let it bubble away for a couple of minutes.

Add the mashed beans to the pan and then enough of the stock to cover all the contents of the pan by about a centimetre. Cover and leave to cook slowly for 5-7 minutes.

Check the pan and add more stock if necessary. Add the rest of the beans and stir them in. Season with salt and pepper.

Continue cooking until the rice and beans are done. Add more stock as the risotto cooks if you think it is needed. As you know you are aiming for a wet texture but not a soupy one, so add stock in small amounts if you are unfamiliar with the rice that you are using or are not experienced at making risottos.

Serve sprinkled with ricotta or another fresh sheeps cheese.

Share this:

  • Share on X (Opens in new window) X
  • Share on Facebook (Opens in new window) Facebook
  • Share on WhatsApp (Opens in new window) WhatsApp
  • Email a link to a friend (Opens in new window) Email
Like Loading...

Spring Greens with a Difference

09 Monday Apr 2012

Posted by Nevenka in Food for One, Main Courses, Snacks and Tapas, Starters

≈ Leave a comment

Tags

Ice Plant, Samphire

After the rain that we have had and now that the temperatures are warming up, it is not only the greens in the veg patch that are sprouting. The hillsides are not only covered in beautiful spring flowers, little pink wild orchids, tiny bee orchids and miniature wild irises only a few centimeters tall, but there is also wild garlic with delicate pink flowers and wild asparagus which is worth the fight with the thorns from last years plant that protects it.

Along the seashore there are delicacies to harvest as well. Crispy bright green Samphire and the succulent leaves of the Ice Plant which are only tender enough  for a short time in the spring to be harvested. Even at this time of the year the Samphire that is in full sun all day has a tendency to be tough, so it is worth searching out bright green sprouts in shady spots. You need to take a pair of scissors and just trim off the tender ends into your bag. You can see from the photo just how you have to seek out this years tender shoots from last years dried out remains.Samphire

The Ice Plant – Mesembryanthemum Cristallinum – is so call because of the crystal-like cells that it has on its surface, particularly the underside of the leaves. To harvest the most tender of the Ice Plant leaves the same applies as the Samphire, look for brighter green leaves in the shade.

For both plants the uses are the same. You can give them a good wash and put them in your salads, steam them and add butter and a touch of lemon and have them to accompany fish, add them to stir frys and Thai curries. The Andalucian way is to make a Revuelto. This would include the wild garlic greens and asparagus, and if you are a bit flush some prawns. Fry the prawns and all your greens in some good olive oil until the prawns are half cooked and the greens a brighter colour. Add some beaten and seasoned eggs and over a very low heat stir until the eggs thicken into a creamy mass. Turn out onto warmed plates and eat immediately with crunchy fresh bread.

Share this:

  • Share on X (Opens in new window) X
  • Share on Facebook (Opens in new window) Facebook
  • Share on WhatsApp (Opens in new window) WhatsApp
  • Email a link to a friend (Opens in new window) Email
Like Loading...
← Older posts
Newer posts →

Create a free website or blog at WordPress.com.

Privacy & Cookies: This site uses cookies. By continuing to use this website, you agree to their use.
To find out more, including how to control cookies, see here: Cookie Policy
  • Subscribe Subscribed
    • fincafood
    • Join 103 other subscribers
    • Already have a WordPress.com account? Log in now.
    • fincafood
    • Subscribe Subscribed
    • Sign up
    • Log in
    • Report this content
    • View site in Reader
    • Manage subscriptions
    • Collapse this bar
 

Loading Comments...
 

    %d