• About
  • La Micaela Farm Shop

fincafood

~ culinary and horticultural life on a Spanish farm

Author Archives: Nevenka

Almond & Garlic Sauce

11 Wednesday Sep 2013

Posted by Nevenka in Food for One, Main Courses

≈ Leave a comment

Tags

Almond & Garlic Sauce, Almonds, Garlic, Rabbit

IMG_0520The almond crop is in for this year, and of course I want to eat some straight away. It has me thinking of dishes using almonds. There are several Spanish sauces that use almonds as one of their main ingredients. Romesco Sauce is a blend of red peppers, both sweet and picante and garlic, thickened with almonds and balanced with red wine vinegar. It is served with fish or grilled vegetables.

I went off to the market to buy fish, but the rabbit looked so plump and tender that I ended up coming home with one instead of the fish. Rabbit with Almond and Garlic Sauce is what I am planning to prepare. this richly flavoured sauce is super simple to make.

RABBIT WITH GARLIC & ALMOND SAUCE

IMG_0530

Per person

1 rabbit leg

20-25 grams almonds

6 cloves garlic

olive oil

salt and freshly ground black pepper

Generously season the rabbit on all sides.

Heat some oil in a shallow pan and when hot add the rabbit leg.

Fry until golden and then turn to fry the other side.

Meanwhile peel the cloves of garlic and add to the pan.

Next the almonds, these can be blanched or left with the brown inner skins on. Add these to the pan.

When the rabbit is nicely browned on both sides add about two tablespoons of water, cover the pan and turn the heat very low. Leave to cook for 20 minutes.

Turn the rabbit over and cook twenty minutes this side.

Remove the rabbit from the pan and keep warm. Put the juices from the pan together with the almonds and garlic into a food  processor and whizz until smoothish. I like to leave a few bigger bits of almond in the sauce rather than have it super smooth, but it is up to you how smooth you want to make  the sauce.

Return the sauce to the pan and reheat.

Serve poured over the rabbit leg.

Share this:

  • Share on X (Opens in new window) X
  • Share on Facebook (Opens in new window) Facebook
  • Share on WhatsApp (Opens in new window) WhatsApp
  • Email a link to a friend (Opens in new window) Email
Like Loading...

Buttered & Caramelised Figs

07 Saturday Sep 2013

Posted by Nevenka in Sweet Things

≈ Leave a comment

Tags

Figs

BUTTERED & CARAMELISED FIGS

In August the fig trees are so replete with fruit that the birds and I between us cannot eat them all. Caramelised Fig Jam has been made, kilos of fruit have been dried, some figs have been transformed into chutney, and as many as one can eat have been eaten – with Ham, with salty cheese, in salads and just on their own. I have successfully used them to make a Fig Tart – you will find the recipe for that in a previous post – but need a new dessert recipe.

This experiment was a success and as the August figs are so sweet, doesn’t need any added sugar. The key to getting it right is not to be afraid to keep cooking. If you stop cooking too early the figs will not have a caramel flavour, so if you let them cool a bit and taste them and they don’t seem done enough, don’t worry, just put them back on the heat and cook some more until they have a faint caramel aroma and a stickiness where they are in contact with the heat at the bottom of the pan.

I have now made this dessert twice, and the second time served the figs still warm with fresh cream and the warm toasted hazel nuts, which was very good too.

IMG_0456

Per person

5 ripe figs

10 grams of butter

Wash the figs and dry them in a tea towel.

Cut off the stems and cut the figs into quarters.

Warm the butter in a non-stick frying pan and add the figs.

Cook stirring on a medium heat. The fruit will start to give out some of its juices, continue cooking until these have evaporated.

Keep stirring and cooking until the fruit mixture is dryer and is frying in the butter.

The sugar in the fruit will now start to get hotter and be heading towards caramelising. Keep cooking until you can detect the caramel aroma. The fig mixture will get dryer and tend to stick to the bottom of the pan a bit, but keep going until they are nice and toffee flavoured.

Do not be tempted to taste the figs at this point, they are very hot.

Leave to cool until warm.

Put into ramekin dishes and smooth the tops. Leave to cool to room temperature.

In the frying pan toast to golden some broken and crushed hazel nuts. Leave to cool to room temperature.

When ready to serve loosen the fig mixture from the sides of the dishes with a knife, put a plate on top and upturn the whole to end up with the fig compote on the plate. The butter should stop the fig mix from sticking to the ramekin.

Serve with ice cream and the hazel nuts scattered over.

Share this:

  • Share on X (Opens in new window) X
  • Share on Facebook (Opens in new window) Facebook
  • Share on WhatsApp (Opens in new window) WhatsApp
  • Email a link to a friend (Opens in new window) Email
Like Loading...

An Indian Feast

03 Tuesday Sep 2013

Posted by Nevenka in Main Courses, Vegetable Dishes

≈ 1 Comment

Tags

Courgettes, Indian Food, Korma, Pork

?????????????????It is a warm summers evening and I have friends coming for dinner. I am in the mood for something spicy and hope that my guests are too. I have a piece of loin of pork that I was going to salt to have as ham at a future date, I recall this recipe for pork cubes in a creamy sauce flavoured with honey and citrus, spiced with cinnamon, cardamoms and turmeric.

I cooked far too much rice yesterday, there may be enough, if I add some chick peas there will definitely be enough. I will fry some red onions and garlic, then add the rice and chick peas to heat them through. A garnish of chopped chives should finish off the dish.

A vegetable dish then. Not in a sauce as I already have one, and picante seeing as the sauce is mild and sweet. I have in my minds eye those lovely spicy vegetable fritters that you get in Indian cooking, but I want to make them lighter and less calorific. I have some courgettes fresh from the garden, in slices they will absorb the flavours of a marinade, then I plan to dust them with Gram flour and grill them.

Some Nan bread and Sweet & Sour Lime Pickle from the farm shop will complete the meal.


PORK BRAISED WITH HONEY – SHIKAR KORMA

IMG_0453

For 4
1 large onion
2 cloves garlic – finely chopped
2 tablespoons honey
30 grams butter
500 grams lean pork cubes
Half teaspoon Cardamom seeds
Heaped teaspoon Turmeric
1 broken quill of cinnamon
2 strips each lemon and. Orange peel
2 tubs full fat yoghurt
1 teaspoon freshly ground black pepper
Salt
1 large onion – sliced
Cream
Fresh coriander
Peel the onion and cut up into small pieces. Put in a shallow pan with the garlic and half the butter. Fry until just starting to brown.
Put in the honey and continue cooking until the honey is thickened and starting to caramelise.
Add the pork cubes and the rest of the butter. Cook until the pork is sealed and browning.
Stir in the turmeric and cardamoms. Add the yogurt and stir in. Add the cinnamon and the strips of peel – use a potato peeler to remove the strips from the fruit.
Lower the heat to the minimum, cover and leave to cook for about 20 minutes.
The dish can be cooked in advance up to this point.
To finish peel and slice the second onion. Fry rapidly in butter until browned and dry.
Rewarm the korma if you have cooked in advance. Add the cream and continue cooking to thicken the sauce. You can remove the pieces of peel and cinnamon at this point in you want to.
Garnish with the chopped fresh coriander and the fried onions.
SPICY GRILLED COURGETTES for 4

???????????????????????

2 medium sized Courgettes – washed and cut into half centimetre thick slices

Marinade –

1 clove garlic

Half teaspoon salt

Piece ginger roughly 2×2 cm

Green chilli

1 tablespoon Olive oil

1 tablespoon Gram (chickpea) flour

Chop the garlic and put it into a mortar with the salt. Mash to a pulp.

Grate the ginger into the mortar and mash to blend with the garlic.

Finely chop the chilli and add to the mortar. Mash again to blend moistening with the olive oil as you go

Add the marinade to the courgettes and mix to make sure that the slices are evenly coated with the marinade. Leave to let the flavours seep into the courgettes for at least an hour.

Heat a griddle or thick based non-stick frying pan.

Dust the courgette slices with gram flour and grill or dry fry until turning from time to time until browned and cooked but still with some bite.

Share this:

  • Share on X (Opens in new window) X
  • Share on Facebook (Opens in new window) Facebook
  • Share on WhatsApp (Opens in new window) WhatsApp
  • Email a link to a friend (Opens in new window) Email
Like Loading...

Thai Green Curry with Seafood & Oriental Salad

26 Monday Aug 2013

Posted by Nevenka in Fish, Food for One, Main Courses, Sauces, Vegetable Dishes

≈ Leave a comment

Tags

Oriental Salad, Salad, Seafood, Thai Green Curry

THAI GREEN CURRY WITH SEAFOOD

I fell in love with Thai cooking on a visit there many years ago, and took copious notes of everything that I ate. Once home I set about recreating the dishes that I had enjoyed while there. I started by buying in the curry pastes, but now that I grow all the essential ingredients on the farm, I make my own, and I am not sure that I could now go back to the bought ones. The difference is the freshness of the taste, that if you do not over process you can have texture to the paste, and also of course that you can balance the proportions of the ingredients depending on how spicy you require it to be.

For a seafood curry, I like spice, but not overpoweringly so, but I still want a good strong flavour of ginger, garlic and lemon grass, so I put with them a milder pale green chilli which still has spice together with a good pepper flavour.

????????????????????????

For the paste – enough for a curry for 4

4 cloves garlic

2 stalks of lemon grass

A piece of ginger, or galangal if you can get it, roughly 5 cm x 2 cm

2 tablespoons Nam Pla – Thai fish sauce

Roughly chop the garlic and pound to a pulp in a mortar.

Take the outer leaves off the lemon grass and cut off the tough base. Finely slice the tender part at the base, usually you get about 2 cm of tender part.

Add to the garlic.

Scrape the skin off the ginger and grate into the mortar with the garlic and lemon grass. Mash with the pestle until a paste adding the fish sauce as you go along.

This paste can be made in advance and be left developing its flavours in the fridge until needed.

For the fish –

Large peeled prawns

Mussels

White meaty fish like swordfish, shark, monkfish, cod, haddock

1 tablespoon each of red and black fish eggs

A large sweet onion or 5-6 spring onions

Large can of coconut milk

Good bunch of basil leaves or Thai parsley

Olive oil for frying

Peel and slice the onion. In a pan big enough to take the curry, soften the onions in oil.

Add the curry paste and fry for a few minutes.

Add the coconut milk and stir well to mix in. Bring to a simmer and start adding the fish.

Keep the curry on a low heat while the fish cooks to ensure that it doesn’t overcook.

The white fish wants to be cut into chunks. If you think that all the fish requires the same amount of cooking, you can add it all in one go.

The fish shouldn’t need more than five minutes to cook.

Lastly add the fish eggs. I had assumed before putting these in hot dishes that they would melt into the sauce, but they don’t and so add colour and texture to fish dishes. They look particularly effective on Salmon with pasta.

Garnish with the chopped herbs and serve with plain boiled rice.

ORIENTAL SALAD

This is adapted from a recipe in Sri Owens fabulous book of Indonesian recipes. I would not call this a fixed recipe as I use whatever is fresh in the vegetable garden. If I plan ahead enough, I get some beansprouts sprouting a few days in advance. They are not available to buy fresh here in Spain, so you have to grow your own. If you cannot get fresh ones, miss them out rather than use the cooked ones that come in jars, the flavour and texture are just not the same.??????????????????????????????????

A selection of the following –

Fresh bean sprouts

French or Yard Long beans – blanched by pouring boiling water over them, leaving them a minute, and then draining and leaving to cool

Chinese leaves or other greens – finely shredded

The following all cut into fine julienne –

Radishes

Carrots

Small tender courgettes

Green peppers

Red peppers

Plus –

Basil leaves – Thai is best, but the usual or Lettuce Basil will do – shredded

Fresh mint leaves

For the dressing – these amounts are for a salad for 4

100 gms roasted peanuts

1-2 cloves of garlic – finely chopped

1teaspoon crumbled shrimp paste or 1 tablespoon Thai fish sauce

Red chilli – to taste – it wants to be quite spicy – finely chopped

1teaspoon soft brown sugar

Juice of a lime

Salt to taste

Put all the prepared vegetables in a dish with the herbs and mix together.

Prepare the dressing. In a mortar pound all the ingredients except the lime juice until a rough paste with the nuts still having some bigger bits for texture. Add the lime juice and mix. Add just enough water to make into a sauce.

Pour over the salad and mix well. Serve at room temperature.

Share this:

  • Share on X (Opens in new window) X
  • Share on Facebook (Opens in new window) Facebook
  • Share on WhatsApp (Opens in new window) WhatsApp
  • Email a link to a friend (Opens in new window) Email
Like Loading...

Borscht – Another Cool Summer Soup

19 Monday Aug 2013

Posted by Nevenka in Starters, Vegetable Dishes

≈ Leave a comment

Tags

Beetroot, Borscht, Soups, Starters

The beetroot grow so fast on the farm here that, throughout the summer, they are tender and tasty. I love them just grated as a salad with a dressing of Balsamic Vinegar and Olive Oil and some cubes of goats cheese on top. When I tire of that, then a lovely light soup is a great dish to make with them. Delicious chilled or hot.

IMG_0380

BORSCHT

For 4

500 grams beetroot

2 cloves garlic

3 tablespoons olive oil

1.5 tablespoons balsamic vinegar

500 ml clear chicken stock

Salt and freshly ground black pepper

Sour cream to serve

Peel the beetroot and chop into small dice.

Peel and finely chop the garlic.

Put  the beets and the garlic in a saucepan with the olive oil and fry gently to soften for about ten minutes.

Add the chicken stock, balsamic vinegar and half a teaspoon of salt. Bring to a simmer and cook until the beetroot is tender. Leave to cool.

Puree in the food processor or liquidiser. Check the seasoning.

Served either chilled or reheated adding a spoon of sour cream.

Share this:

  • Share on X (Opens in new window) X
  • Share on Facebook (Opens in new window) Facebook
  • Share on WhatsApp (Opens in new window) WhatsApp
  • Email a link to a friend (Opens in new window) Email
Like Loading...

Cool Summer Soups

17 Saturday Aug 2013

Posted by Nevenka in Snacks and Tapas, Starters, Vegetable Dishes

≈ Leave a comment

Tags

Fruit Soups, Gazpacho Andaluz, Gazpacho de Sandia, Watermelon Soup

????????????????At this sultry time of year I like to have a jug of soup chilling in the fridge. Solid food is too much in the August heat, and soup can be breakfast. lunch or dinner. When I first came to Spain I quickly found out how to make the classic Gazpacho which uses the richly ripe summer tomatoes, peppers and cucumbers blended with sweet garlic and olive oil. Then in Cordoba I came across Ajo Blanco, made with the new crop almonds and deliciously creamy. Some time later it occurred to me that these soups follow a sort of formula and maybe other vegetables – and fruits could be used to make Gazpacho.

It all started with a bumper crop of slightly too acidic Loquats or Nispero and a vague memory of being served a fruit soup in Hungary while visiting a friends family there with her. The soup was delicious. Since then I have made soup from almost each fruit as they come into season. Cherries are particularly successful. I have used the flat white peaches that we grow on the farm, which make for a very creamy textured soup of the gorgeous delicate peach colour illustrated below. Nectarines, Plums, Apricots – all good.IMG_0377

Right now Watermelon is the fruit, so I have used that for the master recipe. Now that the melons come without seeds that you need to pick out, it is even quicker to make.

GAZPACHO DE SANDIA IMG_0414

This made 1.2 litres, enough for at least 6 servings

Half a watermelon

2 cloves garlic

half a teaspoon of salt

60 ml good olive oil

Simply cut the flesh from the melon into cubes, peel and roughly chop the garlic and then add these with the rest of the ingredients to the food processor or liquidiser and blitz to a puree.

Check the seasoning and then put in the fridge for a couple of hours to chill down and for the flavours to meld.

If you are using a more solid fruit like peaches or plums, you will need to add water to get the right consistency. Some fruits that are very sweet or very ripe benefit from the addition of lemon juice to balance the flavour.

Have fun experimenting with your fruits.IMG_0416

Share this:

  • Share on X (Opens in new window) X
  • Share on Facebook (Opens in new window) Facebook
  • Share on WhatsApp (Opens in new window) WhatsApp
  • Email a link to a friend (Opens in new window) Email
Like Loading...

The Birds & The Bees

12 Monday Aug 2013

Posted by Nevenka in Sweet Things

≈ 1 Comment

Tags

Bees, Cheese, Dessert, Honey, Swallows

I always smile when I see beautiful pictures of pristine white sofas on outdoor terraces in design magazines. Those of you who live in the cool north imagine that we in the south live the majority of the time outdoors with no real line between the outside and inside living space.  While to a large extent this is true, the line between the in and the out has to be more marked than you imagine, particularly if you live in the countryside.  The problem is that the creatures amongst whom I have decided to live quite like the protection of walls and roofs. It’s not that I mind sharing, but there have to be limits. My house is built around a patio which has a central open area surrounded by a roofed shaded part supported by columns. These shaded and protected areas are ideal habitat for nesting swallows. But when you get to four pairs of swallows producing up to forty eight offspring in a summer season, that is an awful lot of bird poo landing on your cushions, walls and floor each morning when they wake up and then each evening when they come back to roost. The Jackson Pollack look is, I feel, a little modern for an old Arab style house.

Then the young play dare swooping in and out of the doorways until the dimmest gets stuck inside and can’t find his way out. I have a two and a half storey tower in the centre of the house which beautifully draws the hot air up and out of its high windows and keeps the house cool without the need for air conditioning. It also traps lost baby swallows. Thankfully when young swallows sleep they sleep the sleep of the dead, so to remove them if they won’t fly low enough to go out of the doors that they came in through, you have to wait for them to go to sleep, usually perched on top of the bar of the wall hangings, and flick them into the swimming pool net before they know what is happening. The doorways are now sufficiently netted to stop the birds getting in.

Apart from the usual bugs that crawl in there are a variety of fliers. We have  long legged red wasps that like to find a nook in which to make little tubes of mud into each of which they lay an egg from which will eventually hatch a new wasp, but leaving behind the clay which is making the sound from you speaker more than muffled.

Bats are amongst the least troublesome guests. They just quietly roost on the patio walls. They do poo, but it is dry and like a small pellet of crushed insects, understandably, as that is what they eat. Easy to sweep up.IMG_2818

Geckos are other welcome guests who earn their place in the house by eating any insects that pass them by while they are skulking on the walls and ceilings at night. They come in a variety of hues and patterns so are very decorative too.

This spring I had a few hundred bees move in.

I first noticed some scout bees doing their informative dance on one of the beams in the patio. I rushed off to consult the internet about what this might mean and was informed that honey bees scout for new sites for the swarm each spring and several sites are usually considered, most being rejected. So I didn’t worry, my site being, in my opinion, unsuitable.

Some days later my neighbour and I were having a coffee in the kitchen when we heard a loud buzzing noise coming from the patio. The air was black with bees. Within ten minutes it was quiet again and not a bee was in sight. I breathed a sigh of relief – my patio I assumed had been rejected. Not a bit of it, on the other side of the patio, where I had seen the scout bees, the whole swarm had settled and looked as though they were planning to stay. I was just about to go on a trip for ten days, so nothing could be done immediately. When I returned the bees looked neater and organised into a rugby ball shape.IMG_0287

I like bees, but I foresaw in the heat of the summer honey dripping down from the swarm and making a mess on the floor, which was bound to be a magnet for ants. Plus all that bee activity only a metre or so from the summer dining table was a little too close for comfort. So they had to be relocated.

I asked around my friends and Antonio was recommended as the man for the job. He came and gave my bees a look over, and then returned the next day with a hive and his full white suit of overalls and a netted hat. Antonio carefully moved the swarm into the hive while I watched from a safe distance. Only later did I read that moving a queen was one of the most dangerous jobs for a beekeeper.IMG_0285IMG_0282

In the ten days or so that the bees had been in the patio they had constructed three round honeycombs about fifteen centimetres in diameter, and had already got quite an amount of honey stored in them as well as some embryo bees. I was quite surprised and impressed at how much work they had done in such a short space of time. Antonio advised that we leave the bees for two or three days to settle in when he would return in the evening once all the worker bees were back in the hive and take them to a new home.IMG_0288

He enquired if I wanted to keep the bees and put the hive somewhere further away from the house, and I did consider the idea. But bees are precious and important creatures, and I have no knowledge or experience of beekeeping and wasn’t sure that would be able to look after them well enough.

The honey though, was delicious.IMG_0293

Here is a very simple northern Spanish dessert using honey. It is exactly my sort of dessert, mixing salt and savoury with sweet and nutty.  A mild immature sheeps cheese works best for this.IMG_0389

For 4

100 grams sheeps cheese

2 tablespoons honey

2 – 3 tablespoons water

60 grams walnut pieces

Slice the cheese and lay it out attractively on individual plates.

In a small pan warm the honey with enough water to have it pourable. When it is hot add the walnuts and heat them through for 30 seconds. Don’t  leave the walnuts too long or they will darken the colour of the honey.

Spoon over the cheese and serve.

Share this:

  • Share on X (Opens in new window) X
  • Share on Facebook (Opens in new window) Facebook
  • Share on WhatsApp (Opens in new window) WhatsApp
  • Email a link to a friend (Opens in new window) Email
Like Loading...

Tarte Flambee, Langos & Provencale Onion Tart

10 Wednesday Jul 2013

Posted by Nevenka in Main Courses, Snacks and Tapas

≈ Leave a comment

Tags

fire bricks, flat breads, Langos, Tarte Flambee

While I am on the theme of flat breads with toppings, I thought I would share with you a small selection from around the world.

I came across a mention of Tarte Flambee in an article recently where the recipe instructed you to buy a ready made pizza base on which to place the toppings. This misses the whole essence of the dish, which is fineness. The bread base wants to be rolled as thinly as you can into a rectangle. When I was cooking this regularly in a restaurant I would use day old dough that was less springy than fresh and consequently easier to roll thinly.

A standard bread dough as in the previous post is used for the base. As I have said roll it thinly into a rectangle to fit either a silicon or metal baking sheet.

????????????The classic topping is a smearing of thick cream, then onion that has previously been sliced thinly and softened in butter and small lardons of smoked streaky bacon.

Preheat the oven to 250 C with the floor lined in fire bricks as in the previous post.

Place the tart on its sheet onto the bricks to bake.

As the dough is thin it will only take five or six minutes for it to be cooked and crisp.

Variations to go on top of the cream –

Sliced mushrooms softened in butter – even better if thy are wild mushrooms – with or without the bacon.

Shredded spinach softened in butter.

Asparagus, either white or green or both.

The onions with thin slices of sauccison sec, or strips of cooked ham, or strips of mortadella.

The Provencale Onion Tart takes the same idea to the south of France and makes it more robust.

Line an oiled shallow tart tin with bread dough rolled to about half a centimetre thick or a bit thicker.

Peel and slice 3 or 4 large onions thinly. Soften in olive oil and continue cooking slowly until the onions are much reduced and starting to caramelise.

Distribute the onions evenly over the base of the tart, drizzle over some cream and decorate with a scattering of black olives.

Bake at 230 C on the bricks for 10 to 15 minutes.

To test if it is done, lift up the tart with a palette knife and check that the dough is cooked to a light brown firmness underneath.

Langos – pronounce the s as sh – hails from Hungary. I was visiting there with some friends, and the family of Zsuzsi prepared this and baked it in the most amazing ancient bread oven in the little house on their allotment.

IMG_0312The toppings for this are put on after the bread is baked. They are laid out on the table in little dishes for each person to serve themselves. There was –

A bowl of sour soft fresh cheese.

Tiny cubes of streaky bacon, fried until quite dry and crisp.

Both sweet and spicy smoked Paprika.

A bowl each of chopped dill, parsley and chives.

The dough for this is made with the addition of mashed potatoes, which makes a very soft and fluffy bread.

Use the bread recipe in the previous post adding 150 grams mashed potato and cutting the water down to 200 ml. If the dough seems too dry at that, then add a little more water. It is impossible to be more precise as potatoes vary so much in their water content.

When the dough is ready, form into individual sized breads about 10 cm across and about a centimetre thick. Put them on a floured tray in a warm draft free place to prove for half an hour.

Heat the oven to 230 C with the fire bricks in. Bake the Langos on the bricks for about ten minutes or until a lighbar brown in colour.

Serve while still warm with the toppings as described.

Other recipes to search out for yourselves are Turkish Pide and Cocas from the Balearic Islands.

Share this:

  • Share on X (Opens in new window) X
  • Share on Facebook (Opens in new window) Facebook
  • Share on WhatsApp (Opens in new window) WhatsApp
  • Email a link to a friend (Opens in new window) Email
Like Loading...

Making your own Perfect Pizza

09 Tuesday Jul 2013

Posted by Nevenka in Main Courses, Starters

≈ 1 Comment

Tags

Mozarella, Pecorino, Pizza

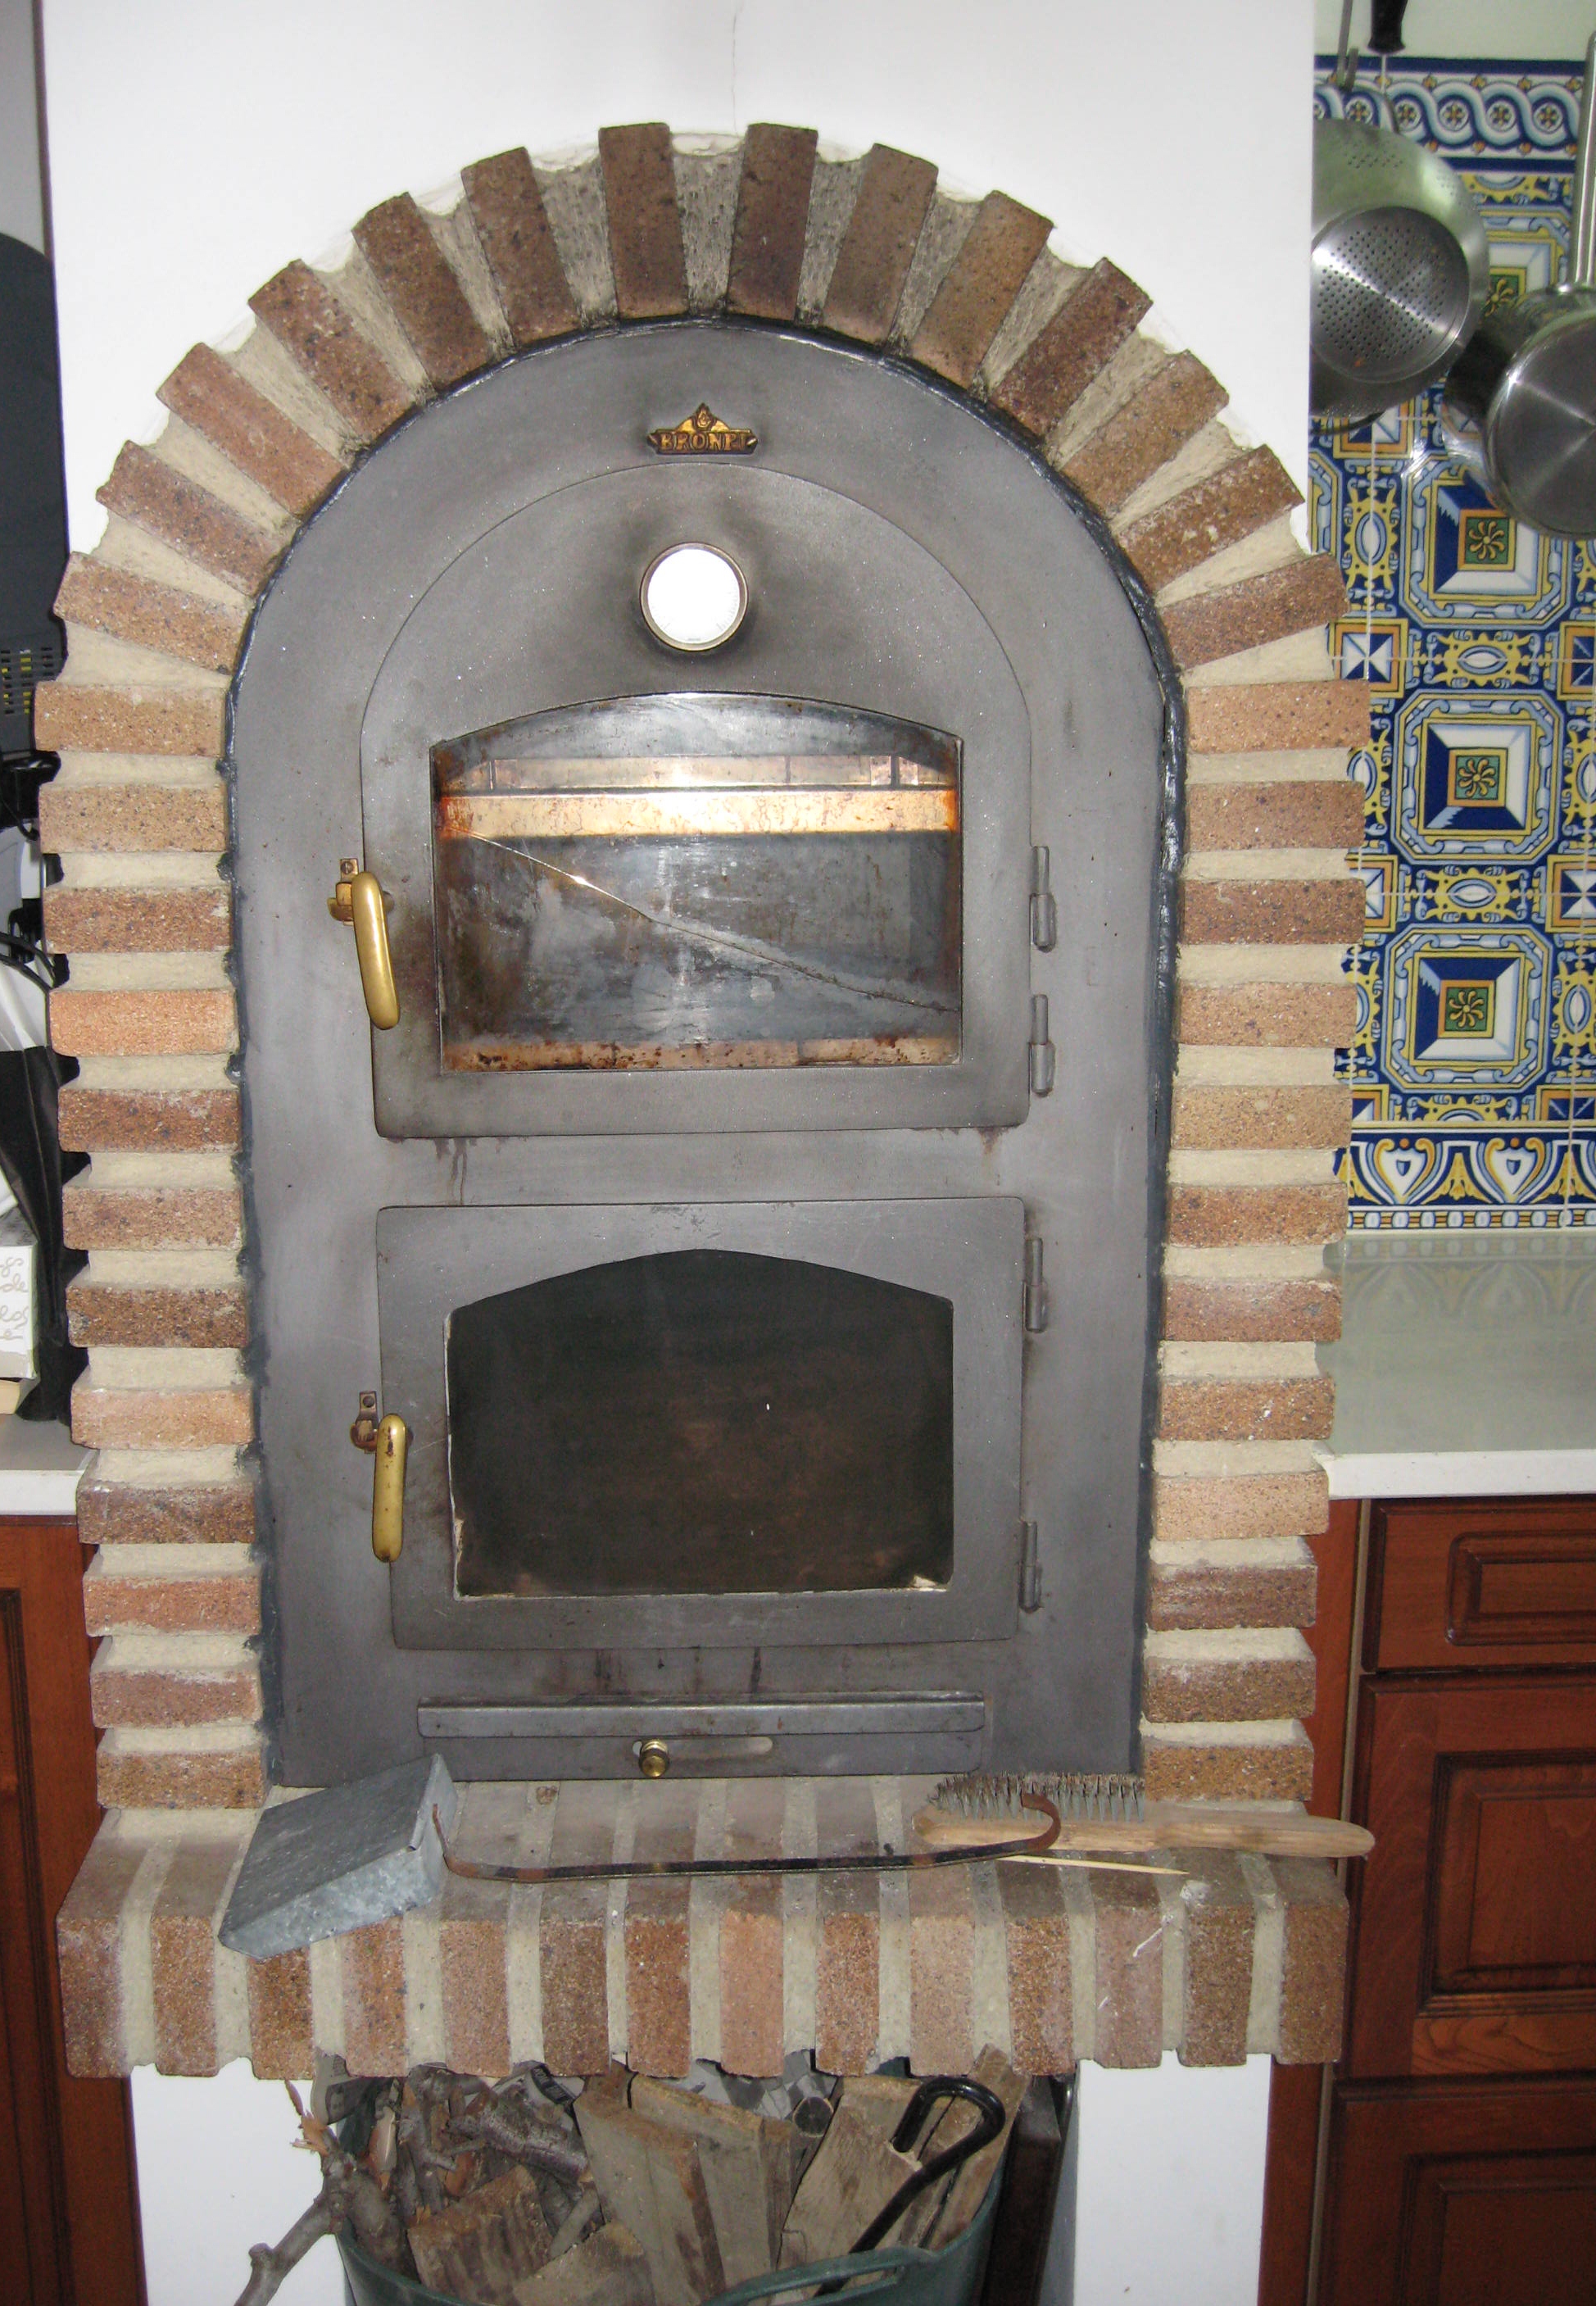
I am very fortunate to have in my kitchen in the farmhouse a fabulous wood burning oven, so for me to make good pizzas at home is not so difficult.IMG_1701

I am well aware that the average kitchen is not so equipped, so I have been experimenting with a standard fan oven to see how to achieve the desired crispy pizza. The key to success involves a trip to your builders suppliers to buy some refractory or fire bricks. These are the bricks that are used to line fire places and traditional ovens. You will not need many, just enough to line a shelf of your oven. Even though I have the wood burning oven, lining the floor with fire bricks has improved hugely the quality of pizzas and breads that I bake.

It is possible to buy online bread stones which will do a similar job, but without buying several and trying them out I cannot vouch for their effectiveness. Having said that, the pros and cons seem to me to be that;  the fire bricks are usually 3 cm thick, which will hold the heat better than something thinner, and so cook the pizza quicker and give a crisper result, but to get the bricks to fit your oven you might have to trim some of them. The fire stones come in a neat size and shape, but are generally thinner, so may not give you such a crisp pizza.

The fire bricks or pizza stones act in a similar way to the thick base of pans – they hold and evenly distribute the heat. When you put your pizza or loaf on the hot bricks, there will be enough heat already in them to start cooking it straight away, and hence you get a crisper result.
The bricks or baking stone need to be put into a cold oven and then heated up, and when you have finished baking leave them in the oven to cool down slowly.
If they cool too rapidly they are likely to crack. In a fan assisted oven heat it to 250 C which is the maximum in mine. At his temperature the pizzas will only take about 7 minutes to cook, so bear this in mind and either remind yourself with a timer, or don’t wander off. This is important when you have guests who can distract you. You can tell that I am speaking from experience here.
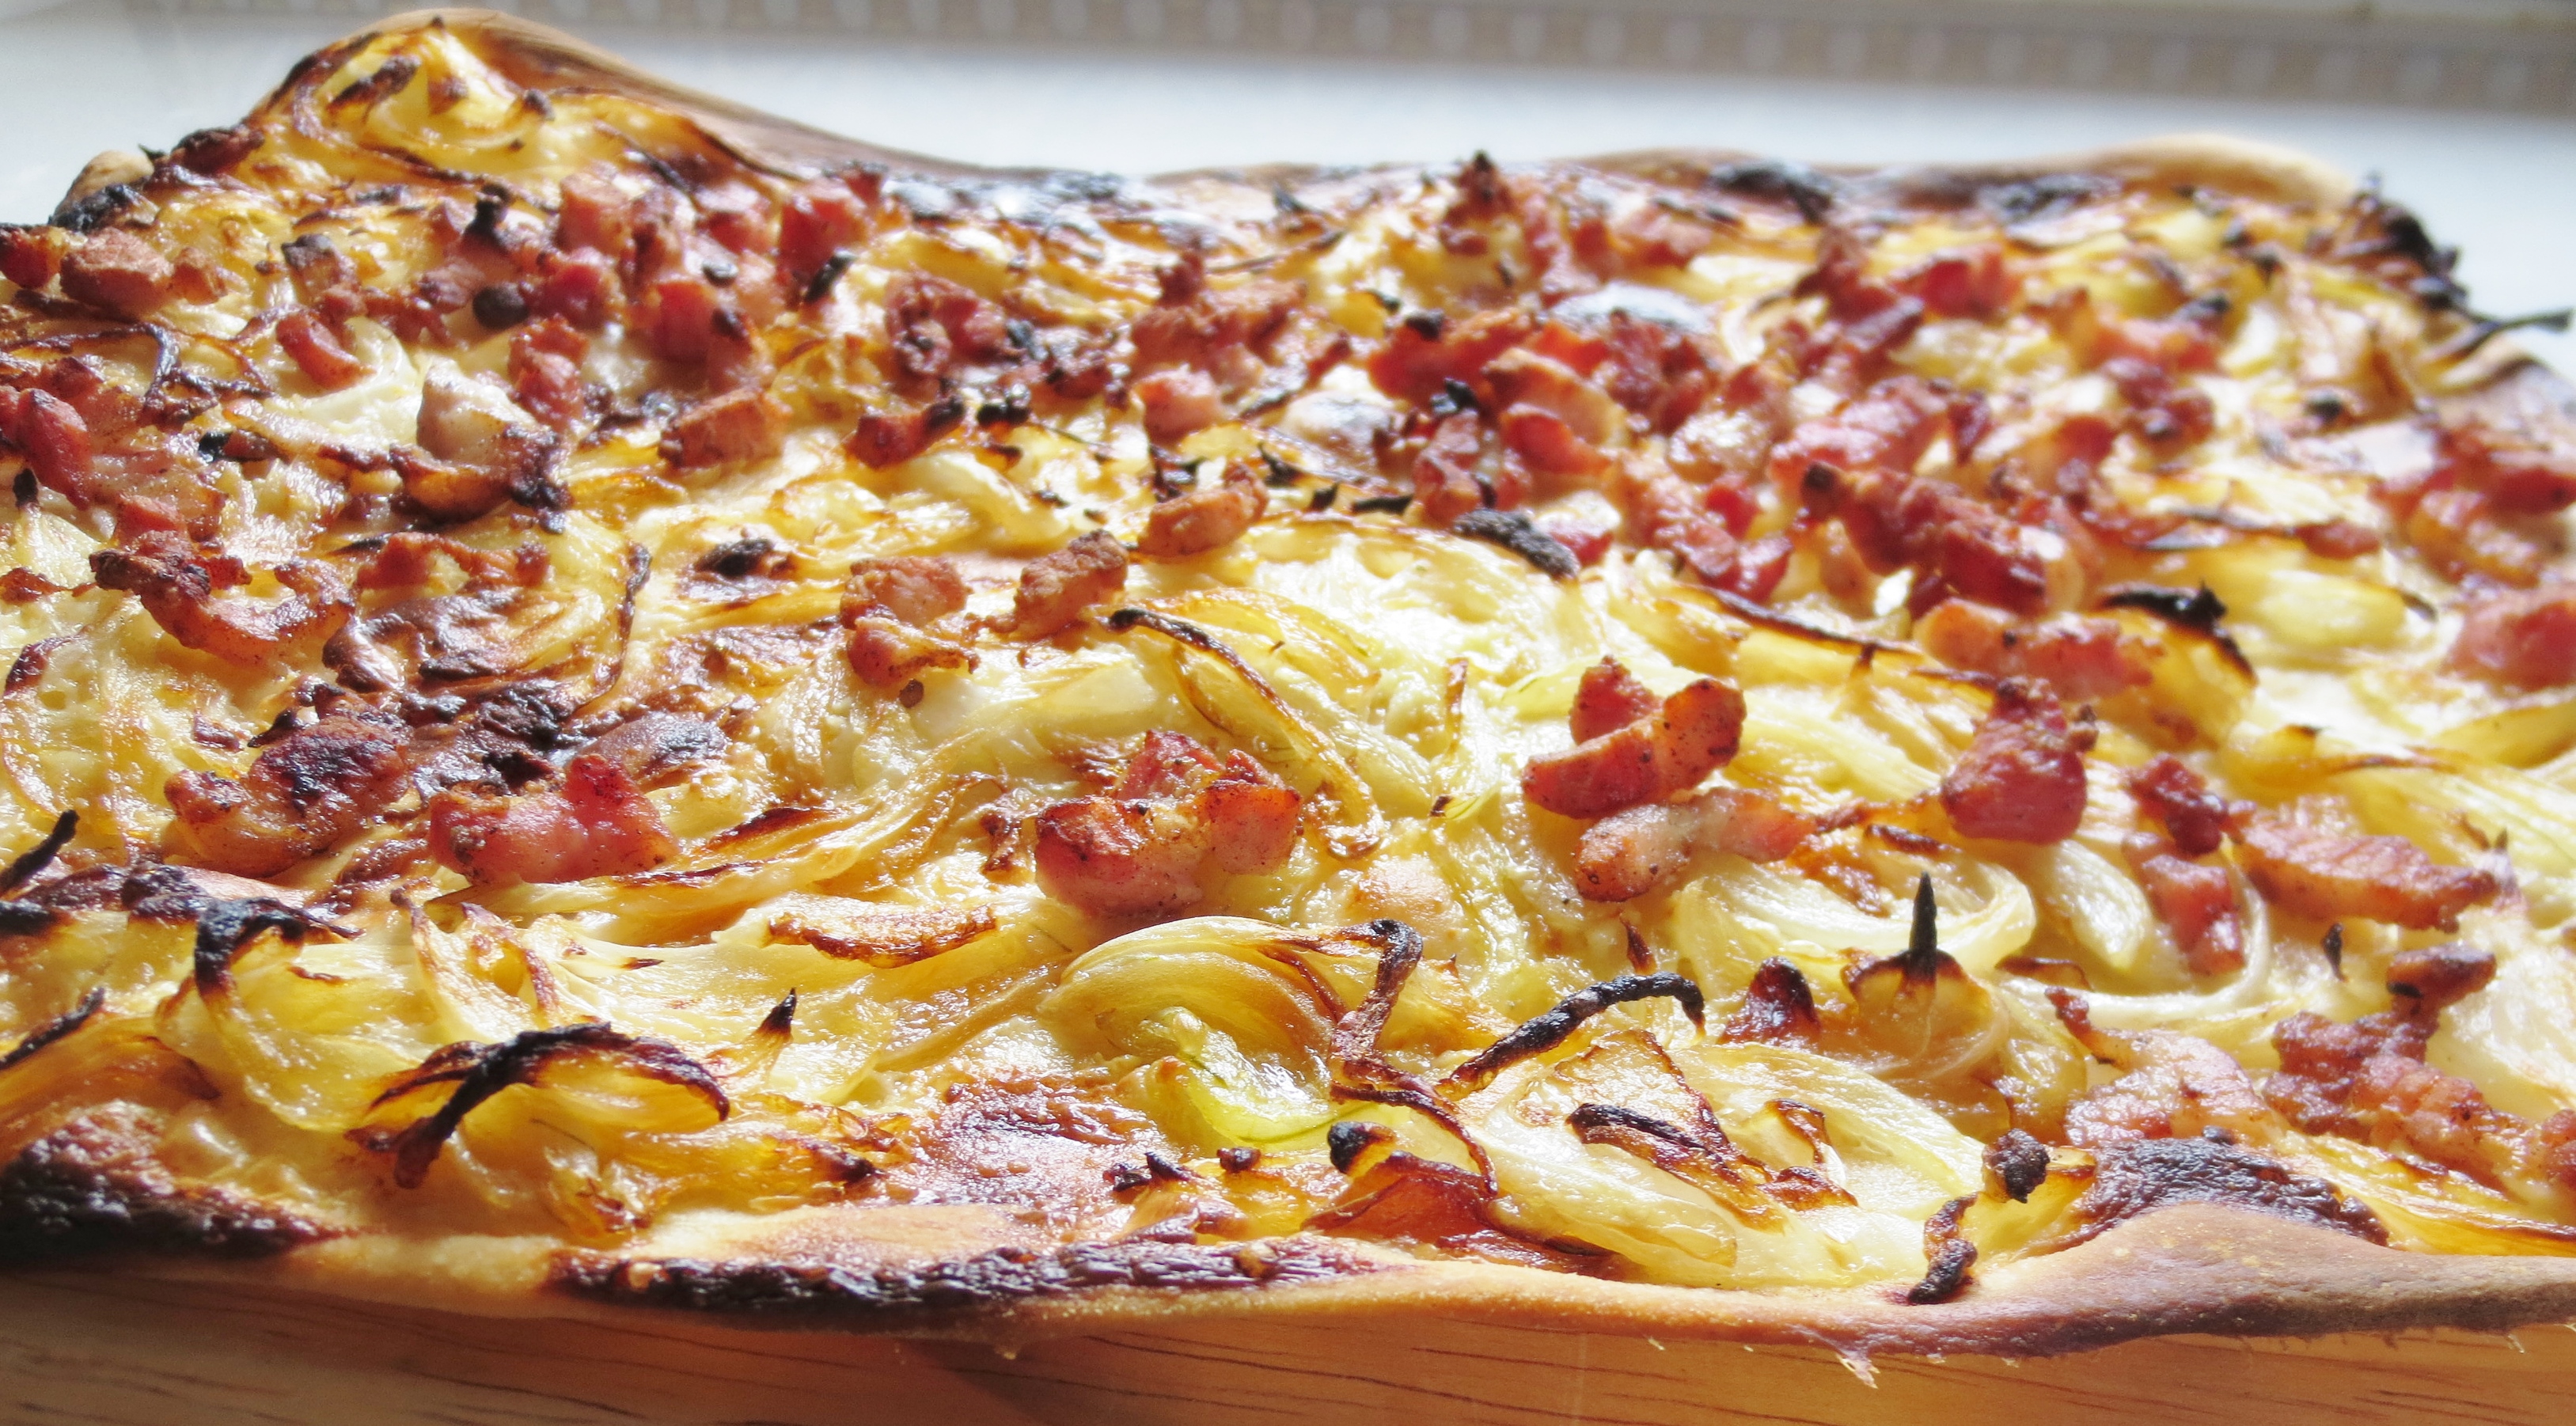
The other key to creating an authentic style crisp pizza is to go light on the toppings especially the wet ingredients. Remember the toppings are there to flavour the bread rather than the bread being a raft for lots of heavy cheese and salami. Also getting the pizza onto the bricks is not so easy and when it is heavy with toppings it is much more likely to break.
For novices I can recommend using one of those silicon sheets. Lay the pizza base on the sheet, add toppings and then put the whole thing on the bricks.
For the pizza base, I use a standard white bread dough –
500 gms strong white bread flour
15 gms fresh yeast or 7 gms dried
300 ml tepid water
1 tablespoon / 15 ml olive oil
1 tablespoon / 15 ml sea salt
I make my dough in a bread machine – simply put all the ingredients in the machine, the order is not important, put it onto the dough programme, and leave it to it.
If you don’t have one then making it by hand is not complicated.
Sieve the flour into a bowl or onto a board and make a well in the centre.
Measure the water in a jug and add to it the salt, yeast and oil. Stir to mix.
Pour the water mix into the well in the flour and bit by bit mix with the flour.
If you have a dough hook attachment for you mixer you can use this.
Turn the dough onto a floured board if it is not already on one, and knead to mix well for about five minutes.
Put into a bowl that will leave room for growth, cover with cling film, put in a warm draft free place for about an hour or until it has doubled in size.
The dough made in the machine and the hand made are snow at the same stage.
Turn the dough onto a floured board and knead for a couple of minutes. It will lose some of its volume, but don’t worry.
It is now ready to be rolled into pizzas. The size is up to you. If you are feeling up to it you can have go at the twirlIng method used by the professionals. I am rubbish at it, so can offer no advice, I use a rolling pin pastry style and plenty of flour on the work surface to stop it sticking.
 IMG_0232
So to toppings.This is where creativity and imagination can be used, although the choices are much more often down to what is in the store cupboard or in season.
The simplest is to brush the rolled dough with olive oil and then sprinkle with salt.
Add chopped or crushed garlic and you have the best ever garlic bread.
The oil with fresh herbs especially rocket, rosemary or basil. Try the herbs with grated lemon zest to add extra zing.
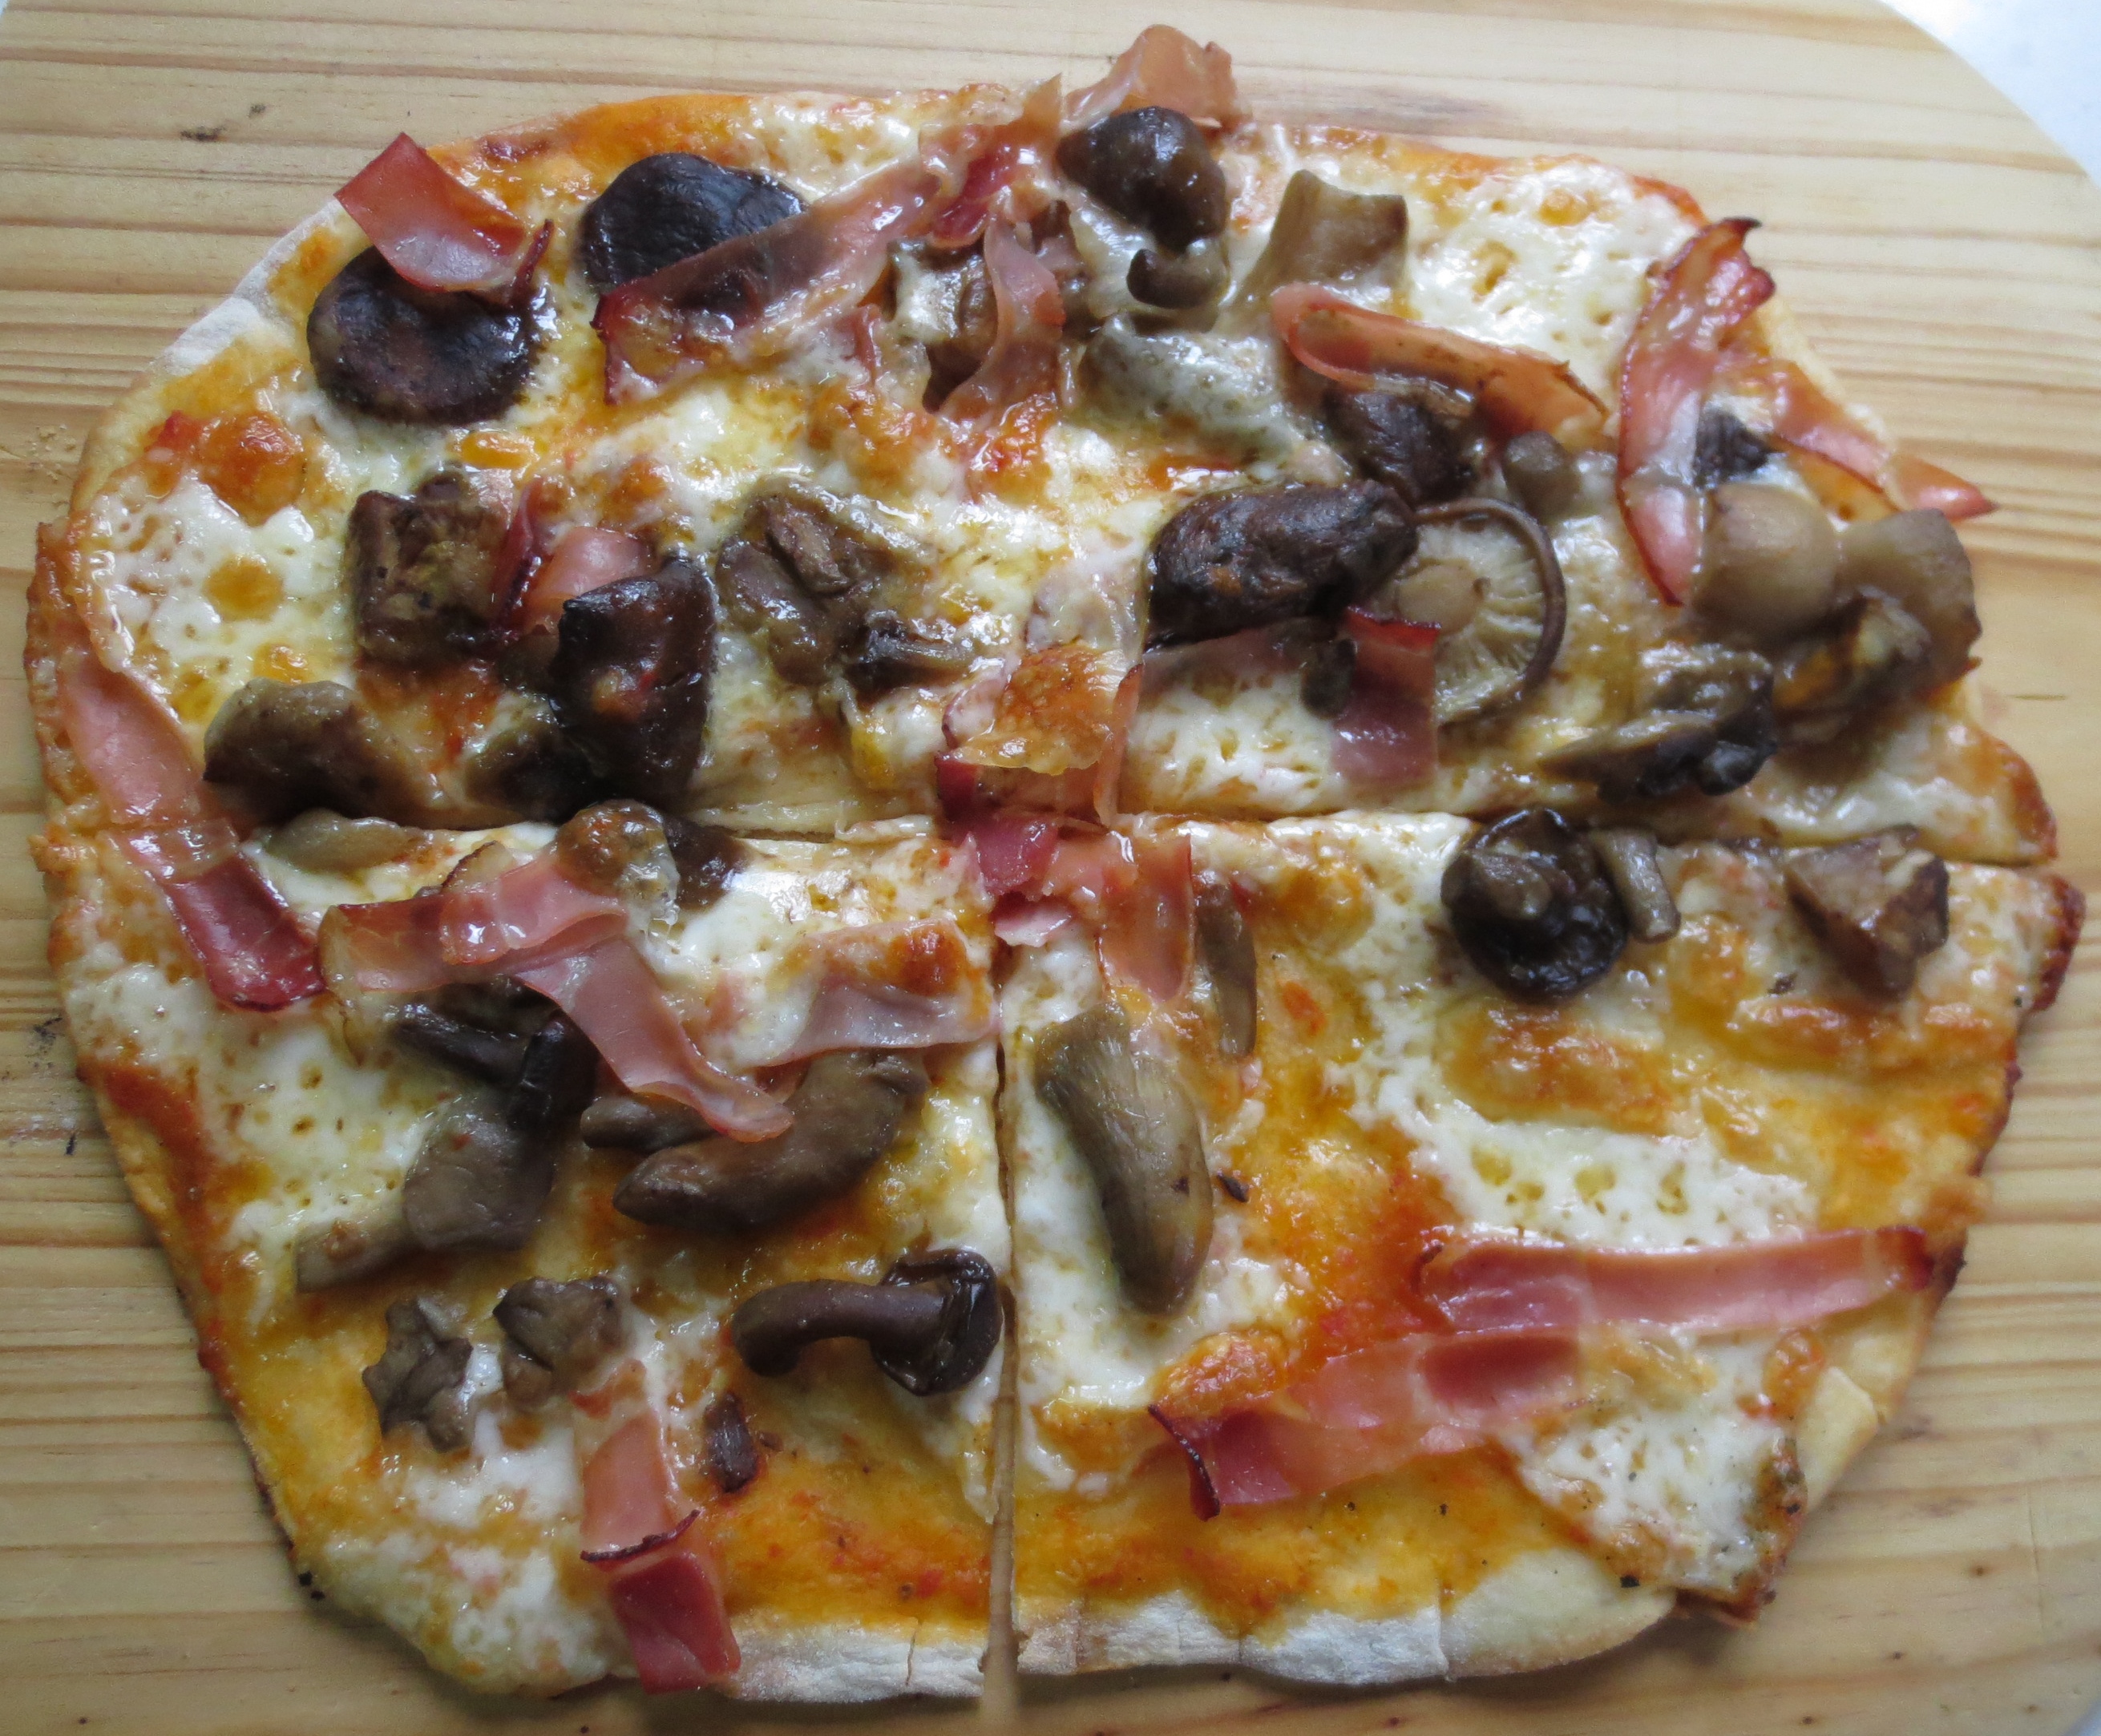
The topping above is yellow and red peppers stewed in olive oil with garlic and chorizo.
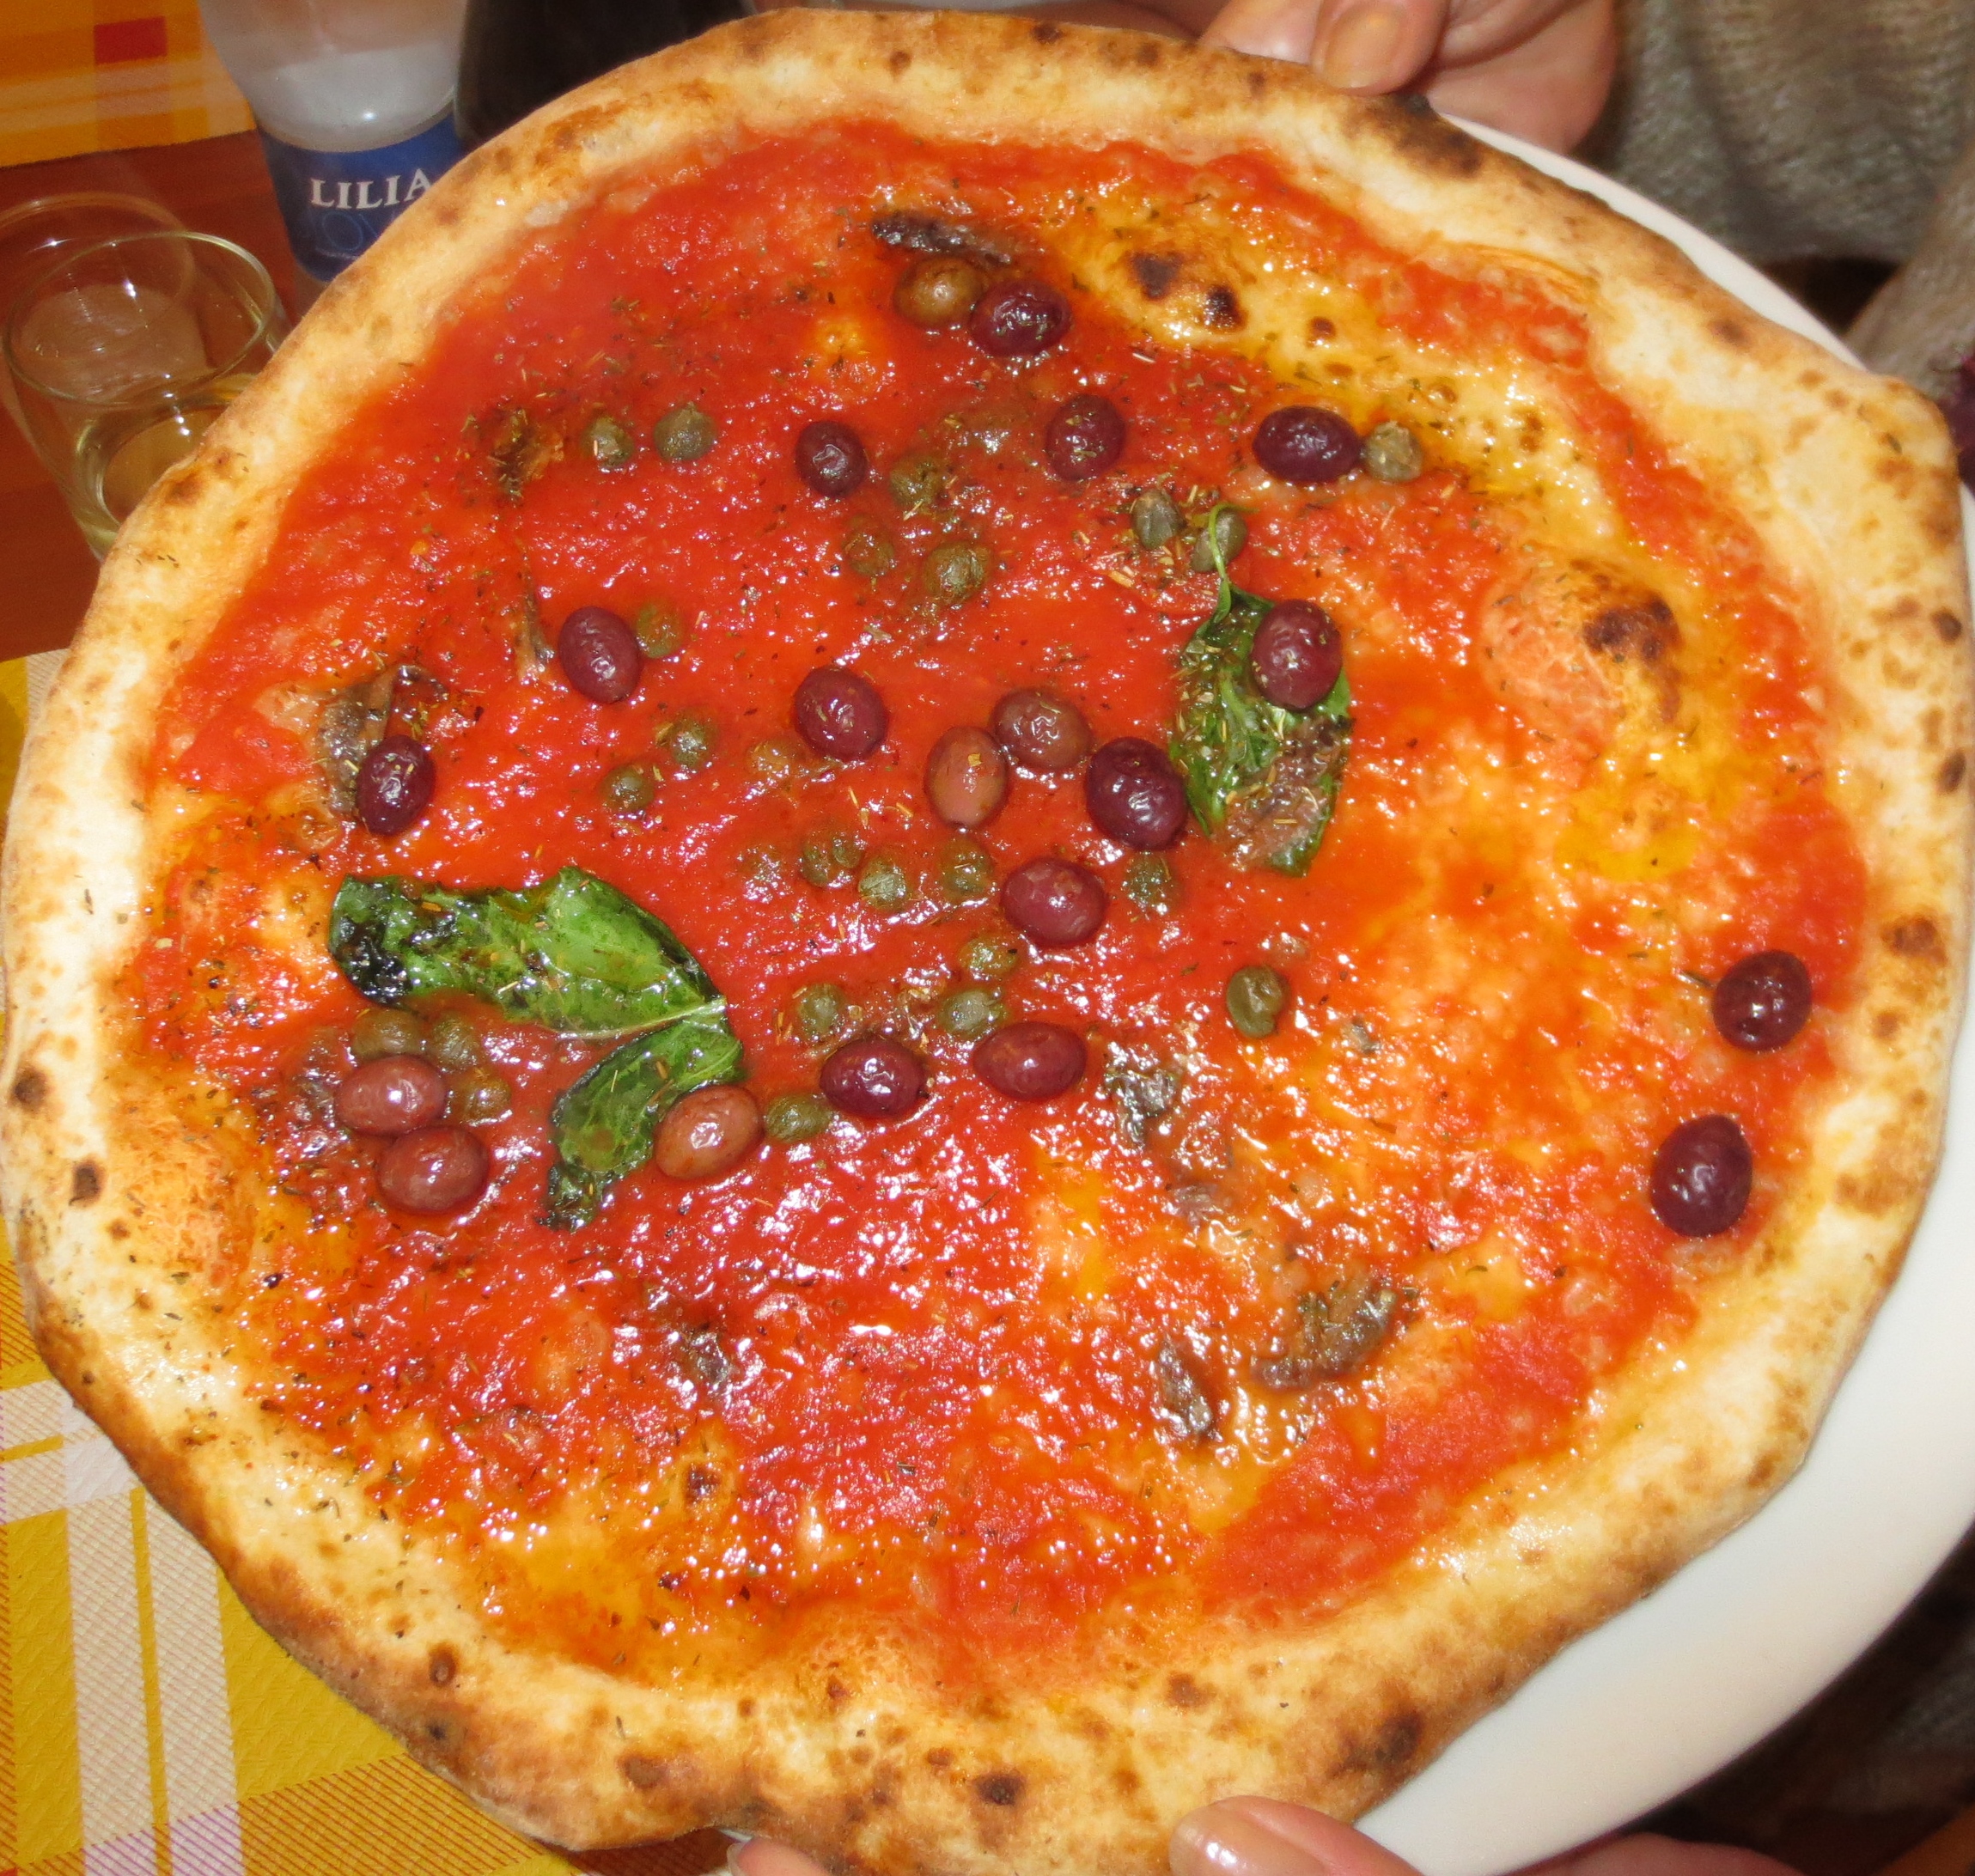
I make Passata in the summer from tomatoes, garlic and courgettes and this is perfect base on pizzas for either seafood, or the Neopolitan mix of black olives, capers, chilli and chopped garlic.
Now we start with the cheese. I love Globe Artichokes sliced thinly and stewed in oil, put onto the pizza base and strewn with grated salty Parmesan.
IMG_0228
A new favourite since the visit to Naples is smoked mozerella and chilli. Here with Parma ham and mushrooms.

IMG_0235 
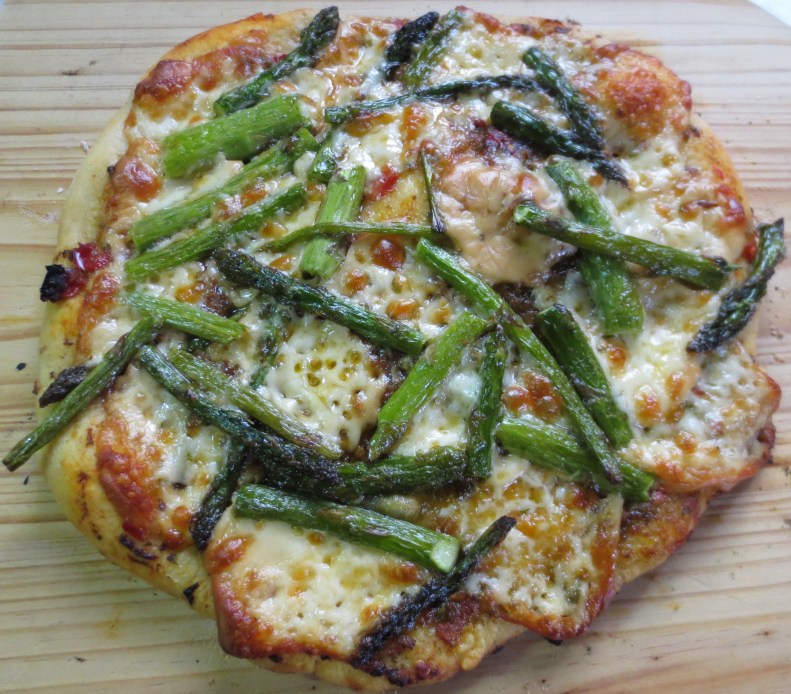
A smearing of tomato, then thin shavings of Pecorino, and fresh Asparagus.

The options are endless and yours to choose. Have fun with them.
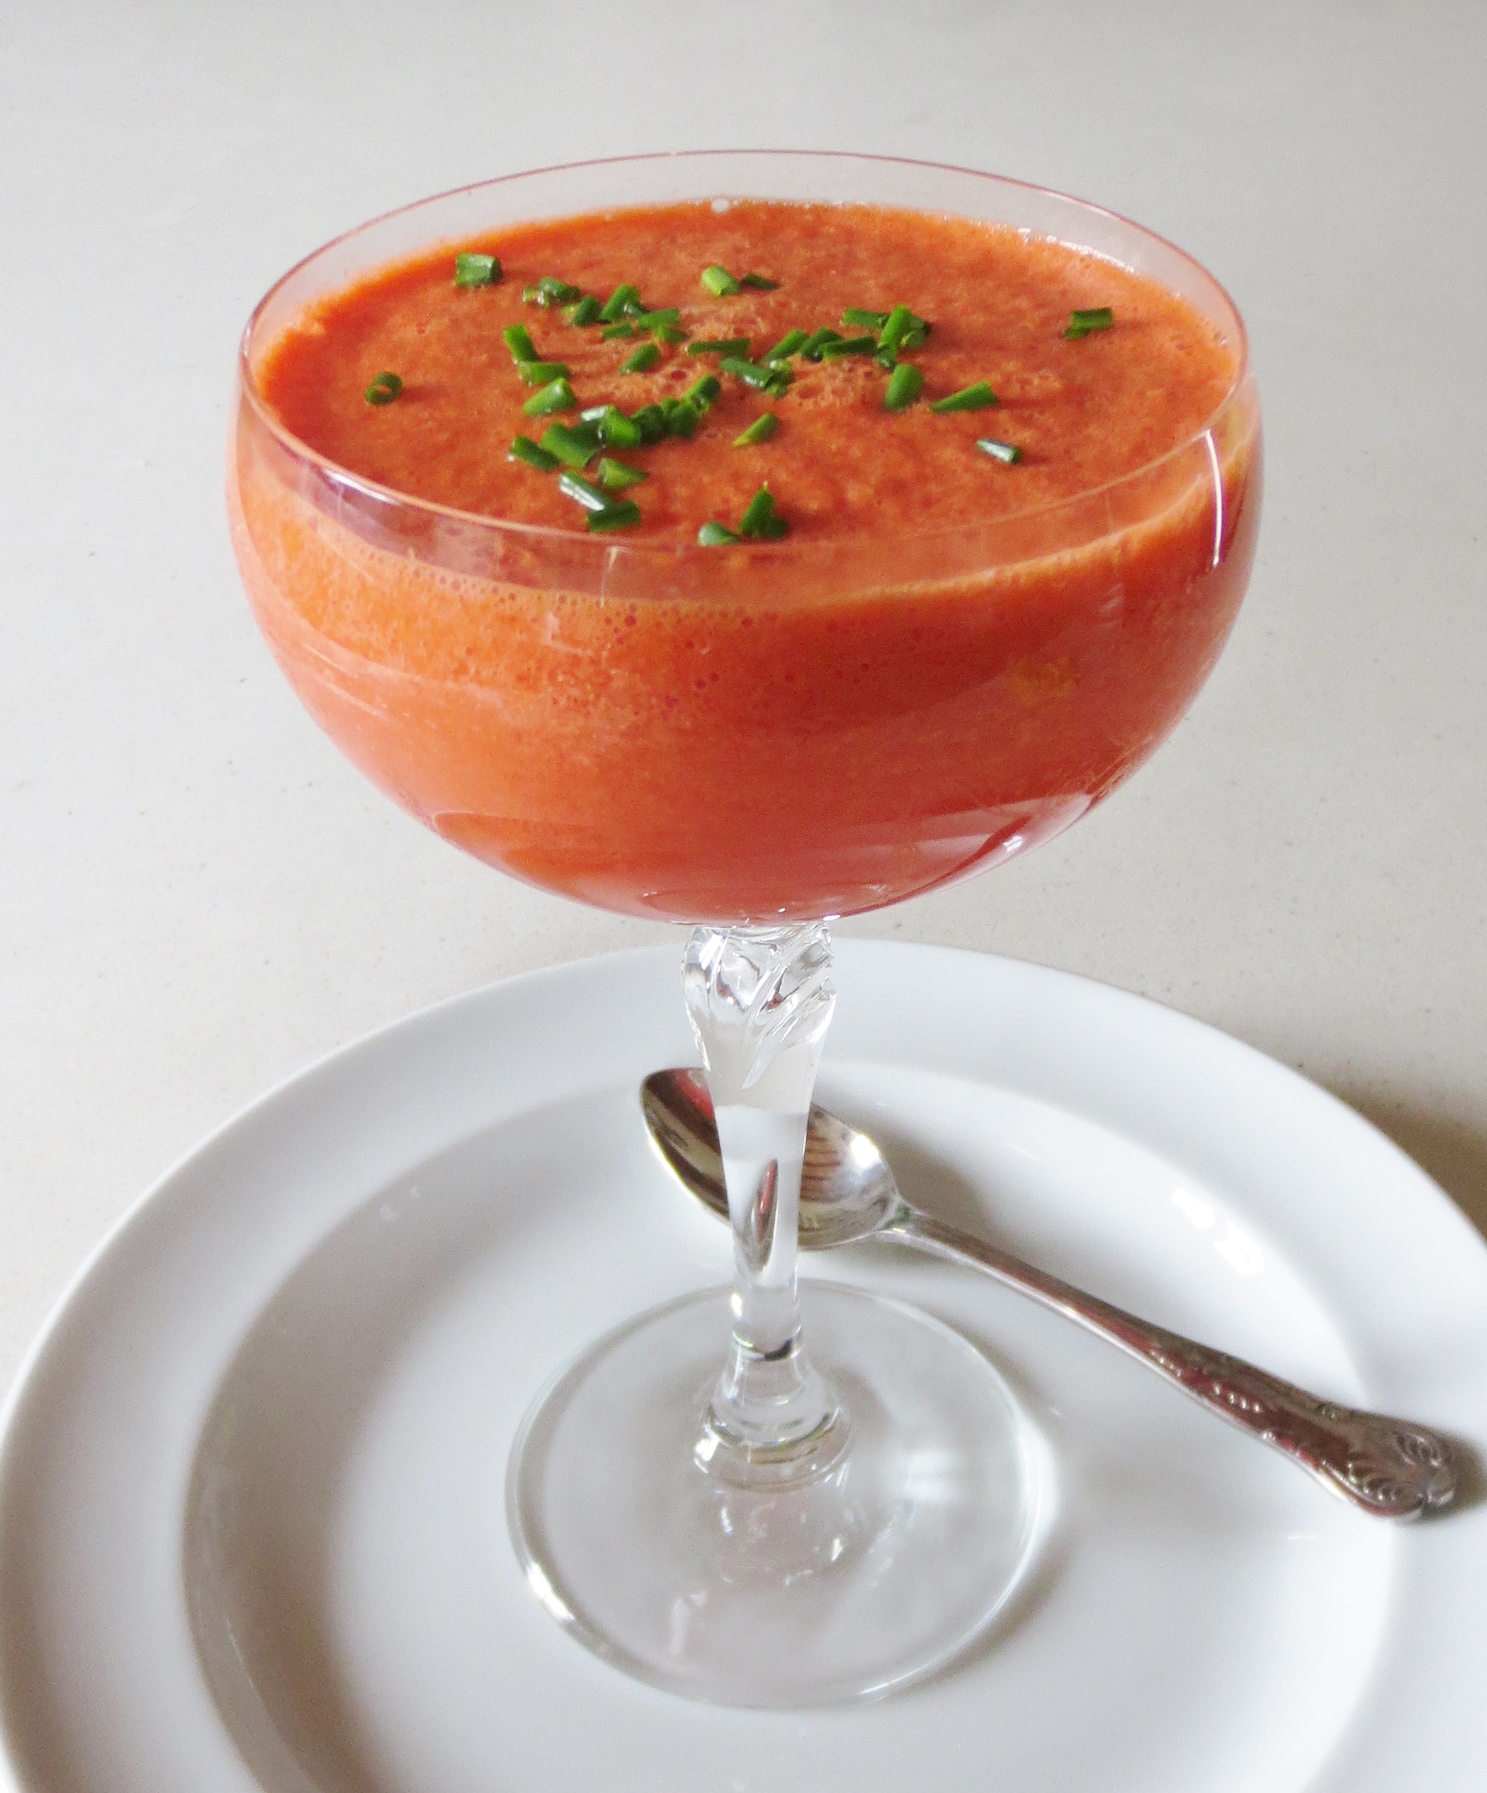
Share this:

  • Share on X (Opens in new window) X
  • Share on Facebook (Opens in new window) Facebook
  • Share on WhatsApp (Opens in new window) WhatsApp
  • Email a link to a friend (Opens in new window) Email
Like Loading...

Neopolitan Pizzas

05 Wednesday Jun 2013

Posted by Nevenka in Main Courses, Starters

≈ Leave a comment

Tags

Mozzarella, Naples, Pizza, Provole

IMG_0199Are there any others you may ask? Naples being the home of the pizza, on a recent visit I just had to search out a restaurant preparing the authentic item. With the help of http://www.napoliunplugged.com I found the perfect place right in the centre of the city. Restaurante Sorbillo is not much more than a cafe with a wood burning oven.

IMG_0197They don’t even bother with salad, they just make pizzas very very well. There were five girls in our party, so we started off thinking that three pizzas between us would be plenty, but the combinations of toppings on offer made it impossible to whittle down to so few, so five it was –IMG_0200We had a cheeseless one topped with tomato sauce, capers, anchovies, olives and fresh chopped chillies.

IMG_0205Then the classical Quatro Stagioni – spring being represented by thinly sliced courgettes and fresh basil leaves atop a creamy mozzarella base. Summer was a smearing of tomato sauce and oregano, mozzarella again and salami. Autumn of course was represented by mushrooms and winter was smoked Provole cheese and with with a tomato sauce.

IMG_0201There was four cheeses with ham and basil leaves and no tomato.

We were so busy eating that I didn’t get photos of the final two pizzas to arrive at our table which were a classical Marguerita, tomato, oregano, mozerella and ham, and our favourite pizza which featured  smoked Provole again, there was a base of tomato sauce and fresh chopped chillies, and on top of the cheese cherry tomatoes and ham. In the next post I will show you how to create these pizzas in your own kitchen.

i leave you with some shots of Naples.IMG_02142013-04-04 16.14.00

Share this:

  • Share on X (Opens in new window) X
  • Share on Facebook (Opens in new window) Facebook
  • Share on WhatsApp (Opens in new window) WhatsApp
  • Email a link to a friend (Opens in new window) Email
Like Loading...
← Older posts
Newer posts →

Blog at WordPress.com.

Privacy & Cookies: This site uses cookies. By continuing to use this website, you agree to their use.
To find out more, including how to control cookies, see here: Cookie Policy
  • Subscribe Subscribed
    • fincafood
    • Join 103 other subscribers
    • Already have a WordPress.com account? Log in now.
    • fincafood
    • Subscribe Subscribed
    • Sign up
    • Log in
    • Report this content
    • View site in Reader
    • Manage subscriptions
    • Collapse this bar
 

Loading Comments...
 

    %d