• About
  • La Micaela Farm Shop

fincafood

~ culinary and horticultural life on a Spanish farm

Category Archives: Techniques

Adventures with Seitan

07 Monday Dec 2020

Posted by Nevenka in Food for One, Main Courses, Techniques, Vegan

≈ Leave a comment

Tags

Gluten, Rice, seitan, stir fried rice

Seitan is made from the protein in wheat, in other words the gluten. All the starch is washed out of the wheat leaving pure gluten which consists of over 80% protein. Quite clearly this is not suitable for anyone who is coeliac or has an intolerance to gluten.
The resulting powder is then seasoned and mixed into a dough with water or stock before being poached. Frequently the Seitan is poached in flavoured stock to take on the taste of a type of meat. For me making a vegetable product taste like meat is not something I feel I need to do, I’m quite happy with vegetables tasting like vegetables. Having said that, Seitan, like tofu is a pretty bland product, so it does need flavour adding to it, I’m having fun experimenting with different flavourings and will share my successes and failures with you. Because seitan has a high protein content it’s texture is quite dense and it can be browned like meat or sliced and then fried to crispness, which can add some interesting textures to dishes.

This first seitan I made, I can’t say I was very happy with the texture, it was very dense and a bit rubbery. It needed fat in it to lighten up the texture. Not one to waste anything, I cut it into matchstick shapes, fried until crisp, which came out pretty good, and added it to oriental fried rice. As the seitan was quite bland this first time of making it, it needed the flavour of the ginger, garlic and chilli to perk it up.

SEITAN – FIRST TRY BASIC RECIPE – ONE PORTION – all spoon measurements are level spoons

4 tablespoons gluten powder

1 tablespoon chickpea flour

pinch of salt

vegetable stock

In a small bowl mix the dry ingredients together.

Add enough water to make a workable dough and knead to a smooth consistency.


Form into a sausage shape.

Heat the stock to a simmer and put the dough into the stock. Keep the heat low so that the stock is only just moving. I find cooking the seitan in a slow cooker on a low setting works well.

Cook for 40 minutes then remove the seitan from the broth.

Cool and cut into matchstick shapes, before frying and adding to the stir fried rice.

Tomorrow Seitan Herb Dumplings for soup.

Advertisement

Pickled Salad

14 Tuesday Jan 2020

Posted by Nevenka in Preserves, Starters, Techniques, Vegan, Vegetable Dishes

≈ Leave a comment

Tags

Carrots, pickled, romanesco cauliflower, Salad, Vegan

This fresh light salad can be made with many different vegetables depending on the season, I will give you the recipe of exactly what I put in this time, and at the end of the recipe a list of the other vegetables that like this type of marinade. The salad is made in a large glass jar which is put on a sunny windowsill for a couple of days to lightly ferment and tenderise the vegetables. The fermentation also adds to the prebiotic qualities of the vegetables.


50 grams sea salt

20 grams sugar

750 ml water

400 ml cider vinegar

romanesco cauliflower – cut into smallish florets

carrots – peeled and very thinly sliced

radishes – very thinly sliced

Spring onion and garlic – sliced diagonally

mustard seeds

In a large jug, mix the water and vinegar with the salt and sugar. Stir well.

Layer the vegetables in a large jar adding a sprinkling of mustard seeds as seasoning with each set of layers.

Push the layers down to compact the vegetables and then see if you need more layers. Once the vegetables soften they will naturally compact down, so it’s a good idea to firm them down at this stage.

Once the jar is full, add the brine and vinegar, fill to the top of the jar.

Stand the jar in a container to catch any overspill of liquid. You will need to put something in the neck of the jar to weigh down the contents and stop them rising above the liquid. I use a small round plastic container to fit inside the jar neck, and a jar of beans as the weight.

Place the whole contraption on a sunny window sill for 2-3 days to ferment. The vegetables will emit bubbles of gas as they marinade, which will push some of the liquid out over the top of the jar, hence the need to have a container to catch the excess.

Once the bubbling has stopped remove the weight, top up the jar with the overspill liquid and more of the brine mix if necessary. Put the lid on the jar. Wash the outside of the jar.

Leave the salad to continue marinating in the fridge for a couple more days and then it will be ready to eat.

The salad will keep for a couple of weeks, so doesn’t need to be eaten all in one sitting.

Other vegetables that can be used for this salad are: white cabbage, Chinese leaves, red peppers, bean sprouts, cucumber and courgettes, broccoli and white cauliflower. The spice and seasoning can be varied too, I used mustard seeds to complement the cauliflower. Dill is traditional in Eastern Europe, coriander, caraway seeds, fresh herbs, citrus peel. If you want to give the salad a more oriental flavour, then add fresh ginger, lemon grass and chilli….and maybe a splash of Nam Pla. Have a play with flavours and see which ones you like!

Mushroom Consommé – and making vegetable stock

06 Monday Jan 2020

Posted by Nevenka in Starters, Techniques, Vegan, Vegetable Dishes

≈ Leave a comment

Tags

enoki mushroom soup, Vegetarian consomme


Making vegetable stock is easy especially if you have the tougher leaves from your own vegetables or buy them from a market where they are not trimmed down to the cleaner more tender parts. Don’t be rigid about what goes into the stock pot, pea and bean pods are fine, the tough stems of broccoli and cabbage, the sad vegetables in your bin at the end of the week including wrinkly tomatoes and peppers and, failing all that, one of those mixed stew packs will make good stock. I generally like to include onion and carrots, and then whatever else is available, the more variety the better.

The stock for this soup was made with –

the pods from some broad beans

the green tops of a bunch of spring onion and a bunch of spring garlic

the base and tough stems of one of those green cauliflowers with pyramids

the white stems of a bunch of Swiss card

the thick stem of a broccoli

a couple of soft carrots

Wash everything and scrub rather than peel the carrots. Trim dirty ends off then roughly chop everything and put in a large pan.

Pour in boiling water to just cover, bring to the boil then turn down the heat and leave to simmer for an hour.

Don’t add salt at this point as when you come to use the stock you may want to add salty flavourings or reduce the stock in which case you would end up with a dish that’s too salty.

Turn off the heat and leave to cool.

MUSHROOM CONSOMMÉ – three servings

1.2 litres vegetable stock

50 grams Fresh enoki mushrooms

1/2 teaspoon marmite

1 teaspoon light soy sauce

2 slices fresh ginger

finely chopped parsley

Put the cool stock in a pan and add the mushrooms and ginger.

Stir in the Marmite and soy sauce.

Leave the soup for at least an hour for the flavours to blend.

Ten minutes before you are ready to serve the soup, bring it slowly to the boil and let simmer for a couple of minutes.

Serve with the parsley sprinkled over.

Chilli Jam

15 Sunday Dec 2019

Posted by Nevenka in Preserves, Sauces, Techniques, Vegan

≈ Leave a comment

Tags

chilli jam, Chillis

I could have sworn that I’d posted this recipe a long time ago, but apparently not, so for all those who have asked for it, here it is!

Its really quite a simple thing to make, but a couple of pointers regarding the preserving. I save any small and medium jars that have screw top lids with a seal on the inside. If these are washed in the dishwasher on a hot cycle that is good enough to sterilise them, but when I come to fill them I have a pan of boiling water on the stove into which I put the jars for a couple of minutes to sterilise them again.

1 kilo red chillis – any type or a mixture of varieties

2 litres water

600 grams preserving sugar

1 kilo granulated sugar

It’s a good idea to wear rubber gloves for dealing with the chillis especially if you are preserving several kilos.

Wash the chillis. Cut the stems off and then roughly chop and put into the food processor. Blitz until finely chopped.

Put in a large pan with the water and sugar.

The sugars I have used as above will make more of a thick sauce than a set jam, so if you want the jam to set you will need to use either all preserving sugar or granulated sugar and pectin. The pectin will come with instructions on the amount to use. I can’t buy pectin or preserving sugar easily here in Spain, and when I do find it it’s very expensive.

Bring to a rolling boil until setting point temperature is reached – 105C or 220F

If you don’t have a jam thermometer then put a saucer in the freezer and chill for five to ten minutes. Put half a teaspoon of the jam on the saucer then pop it back in the freezer for a couple of minutes, then you should get an idea of the thickness of the jam. If it forms a light skin it will definitely set.

Let the jam cool for a short while. Have a pan of boiling water on the stove ready to re sterilise your jars. Fish them out of the hot water with tongs and drain on a clean tea towel. Put the lids in the boiling water to heat and sterilise them too.

Fill the jars with the jam to about a centimetre from the top. Clean any jam from around the neck and rim of the jars. Loosely put on the lids.

Go back after five minutes and tighten the lids. Let cool completely.

Clean any dribbles from the outside of the jars and label.

If the jam is well sealed it will keep for a couple of years if stored in a cool dark place.

Berenjenas en Escabeche – Aubergines in Spicy Sauce

11 Sunday May 2014

Posted by Nevenka in Preserves, Techniques, Vegetable Dishes

≈ Leave a comment

Tags

Aubergine, Berenjenas, Escabeche, preserves. pickles, Vegetables

When you grow aubergines the first year plants will start to give you fruit in June or July and then continue until about November or early December depending on the weather. You can take out the plants at this point and start again the next year, but with the frost free winters here I can leave mine in the ground. They will have a little rest for a month or two and then start to produce fruit again. The fruits tend to be smaller and paler than the summer fruit, but plentiful.

IMG_1118

When there are more than I can eat fresh, I like to cook them in this spicy sauce and bottle them for serving as part of a mixed starter later. Escabeche is a method used a lot here in Spain for preserving usually fish. It is highly flavoured with garlic and smoked paprika, and then vinegar and white wine are used to aid the preserving process.

For a slightly more eastern mood to the escabeche for preserving aubergines I like to add some cumin seeds and use quite a hot piquant paprika.

500 grams  small aubergines

1 head garlic

150 ml olive oil

150 ml white wine

150 ml white wine vinegar

15 ml cumin seeds

30 ml smoked paprika – picante

Salt

To cook the preserve you will need a large shallow thick based pan in which you can cook the aubergines in one layer.

Divide the head of garlic into cloves and peel each one. If some are very large slice them in half.

Wash the aubergines and remove the stalks. Cut the fruits in half from top to bottom.

Heat the oil in the pan and add the garlic.

Once the garlics start to sizzle turn them over and move them to the edges of the pan.

Add the aubergines cut side down and fry gently for 5 to 10 minutes until golden brown.

IMG_1120

Turn over and fry on the other side.

Add the cumin seeds and paprika, then the vinegar and wine. Shake the pan to mix the spices and liquid without disturbing the aubergine pieces.

Add enough water to just cover the aubergines and season with salt, half a teaspoon.

Cook covered for 5 minutes.

Gently turn over each of the aubergines, I use tongs for this, and continue cooking covered until the aubergines are cooked through but not mushy. This should take between 5 and 10 minutes.

Some of the liquid will by now have been absorbed by the aubergines and so will look reduced.

Put the aubergines while still hot in hot sterilised jars, seal them and cool.

IMG_1173

Serve as either part of a mixed starter, with cheese or they are very good with lamb dishes.

IMG_1170


Polenta………& learning to love it.

01 Thursday May 2014

Posted by Nevenka in Fish, Main Courses, Techniques, Vegetable Dishes

≈ Leave a comment

Tags

Bacon, Fennel, Polenta, Polenta Cake, Polenta Souffle, Vegetables

I know that there are plenty of you out there who are as I previously was with Polenta. You started off curious so tried it in various restaurants and found yourself underwhelmed. It was allright, but you couldn’t see what the fuss was about.

Not types to give up, and armed with the opinion that Italians know about food, so it would be worth giving it another chance, you have a go at cooking it at home. Armed with an authentic Italian recipe from a reliable source you boil, and stir, and stir, and cool, and cut and reheat with a sauce………and still find yourself unexcited.

So you abandon Polenta for a number of years…..

…….then when you have forgotten all about it you are served in a restaurant to accompany the meat, a golden cake lightly browned and crisped on the edges and creamy in the centre. Filled with tiny strips of fried bacon and diced vegetables, flavoured with garlic and chicken stock. It is absolutely delicious. It takes you some time to realise that the main ingredient is the polenta that you have up to now been unimpressed by.

???????????????????????????????????????

A re-evaluation is obviously in order. This is where the path to loving Polenta starts, let me lead you through my trials to success and enjoyment.

Firstly the Polenta itself. I read somewhere that it is only good during the first six months after it is milled. I have tried fresh and It does have a slightly more corn flavour, but not so much that it makes that much difference. Having said that any dried goods – beans, lentils, quinoa, rice, flour, and polenta should not be kept for more than a couple of years and preferably used within a year. These are products where the use by dates should be taken note of, you won’t get food poisoning but the grains lose their ability to reconstitute and stay dry and hard and of course the flavour of them slowly fades.

Cooking liquid. I have read debates as to whether water or milk are the best and most authentic cooking liquids, but I am not impressed with either. Let’s face it, polenta is a pretty bland grain, and so any extra flavour that can be added should be. I like to cook the polenta in a light stock, either chicken, veal, or if you are vegetarian, a vegetable stock.

Stirring. Every recipe I have come across, and the instructions on the polenta packet, tell you to bring the liquid to the boil, whisk in the polenta, stir until boiling again and then keep stirring for forty minutes with the heat turned low. Well, I haven’t got the time or patience to stand around stirring for forty minutes and I suspect neither do Italians or you. I find that stirring from time to time during the first ten minutes will do, then turn off the heat, cover with a well fitting lid and leave it to continue cooking in its own steam for forty minutes. Alternatively once it is back boiling after adding the polenta, pour into a slow cooker and continue cooking on a low setting for half an hour, then turn of the cooker and leave the polenta to cook in the residual heat for another half hour.

BASIC RECIPE – for 8-10 servings

350 grams polenta

1.75-2 litres light stock

salt and freshly ground black pepper

If you want a very firm polenta for leaving to cool and form into a cake, use the smaller amount of stock, and if you want a softer puree consistency for eating immediately, then the larger amount of stock.

Put the stock in a thick based saucepan with half a teaspoon of salt and bring to the boil.

Pour in the polenta in a steady stream stirring continually. Turn down the heat and keep stirring as the polenta thickens, this should take about 10 minutes.

Either put a lid on the polenta and turn of the heat leaving the polenta to continue cooking in its own steam or transfer the polenta to a slow cooker on the lowest setting and leave to cook for 30 minutes before turning off the heat and giving it a stir.

Continue with your chosen recipe.

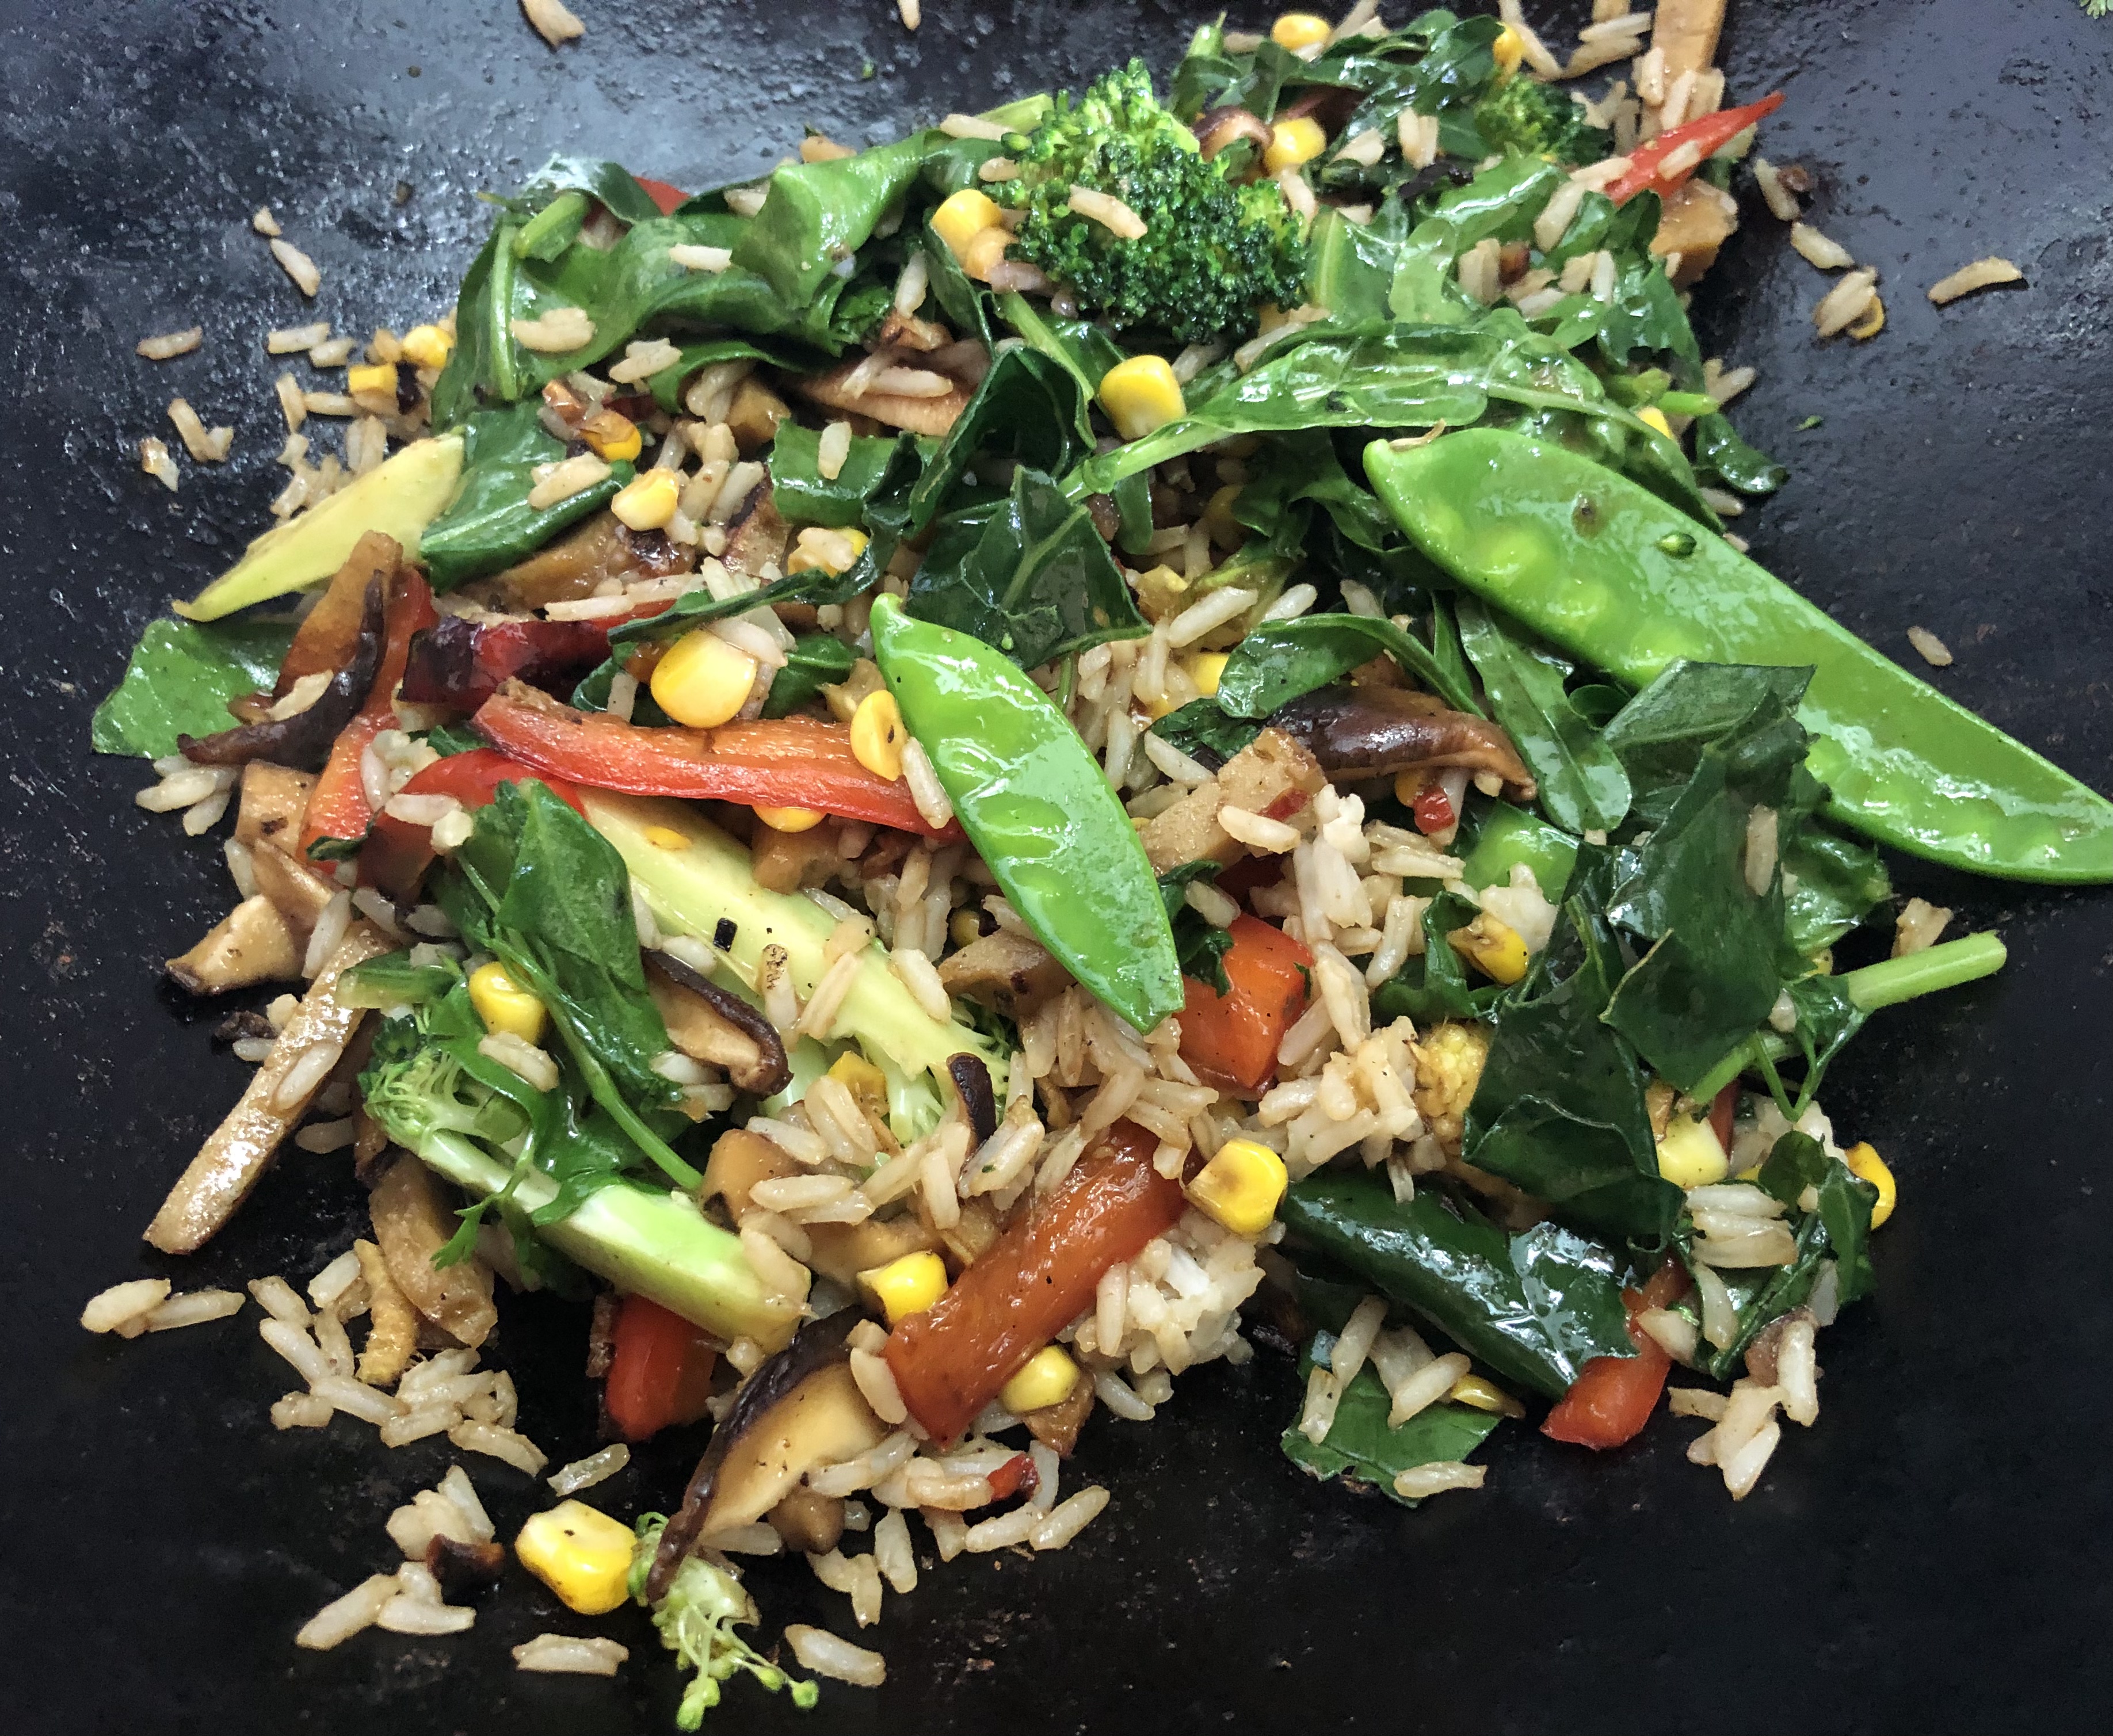
POLENTA AND VEGETABLE CAKE – Pictured above

I make this when I have a lot of people to feed as almost all can be prepared the day before, all that has to be done on the day is slicing the loaf and putting it onto a hot tray in the oven. Plus it is the vegetable and starch all in one.

It is great with something saucy like a stew. Last time I made it was to go with Pork Bourgignon – see previous post on Pigs Cheeks.

If you want to make a vegetarian version of this substitute nut pieces for the bacon and use olive oil for the frying

100 grams streaky bacon – cut into small dice

30 grams bacon fat – cut into small dice

1 clove garlic – finely chopped

1 small onion or half a large one – finely chopped

200 grams vegetables – cut into small dice – choose three or four from the following – carrots, parsnips, peppers, mushrooms, sweet peas, Florence fennel, broccoli, celeriac, butternut squash. Try to mix the colours to make it interesting.

Thick polenta as master recipe – cooked in vegetable stock if making the meatless version.

Heat a thick based frying pan and add the dice bacon fat. Cook on a low heat until it has rendered down and released its fat.

Add the bacon and cook for five minutes.

Add the onions and garlic, stir in and fry for a couple of minutes.

Add the diced vegetables and fry for about 10 minutes until the vegetables are about half cooked and have lost some of their moisture.

Add the vegetable and bacon mix to the polenta while both are still warm and gently mix the whole together. Season with plenty of freshly ground black pepper and check if it needs more salt.

Turn into a small loaf tin lined with cling film. Gently flatten to make sure that there are no pockets of air and smooth out the top. Fold the cling film over the top and put the loaf in the fridge to cool and firm up.

About 45 minutes before you need to serve the loaf, heat the oven to 180 centigrade. When the oven is hot, put in a shallow baking tray containing a couple of tablespoons of tasty dripping or olive oil.

Take the loaf out of the fridge and remove from tin. Peel off it’s cling film and cut into slabs about one and a half centimetres thick.

Put onto the now hot fat in the baking tray. Put back In the oven and roast for about 15 to 20 minutes until browned and crispy at the edges.

WHITE POLENTA PURÉE WITH FENNEL AND ORANGE.

Salmon, White Polenta, Saffron Sauce

White polenta is traditionally eaten with fish in Italy. It has a slightly softer smoother texture. Don’t worry if you can’t find white polenta, this is still good with the more easily available yellow.

Master recipe soft polenta made with white grains.

100 grams Florence fennel – cut into small dice

25 grams butter

Grated zest and juice of one orange

Salt and freshly ground black pepper.

Fry the diced fennel slowly in the butter until cooked but still with a little firmness.

Cook the polenta as the recipe. Add the orange zest and juice. Stir well to mix in.

Add the fennel and stir gently to mix in.

Serve with fish of your choice.

SOUFFLED POLENTA

Use either white or yellow polenta

Firm polenta as master recipe

3 eggs

50 grams finely grated Parmesan cheese

Cook the polenta as recipe and leave to cool a bit.

Heat the oven to 170 centigrade.

Grease an ovenproof dish about the right size to take the soufflé, individual ramekins can be used if you like.

Separate the eggs. Add the yolks to the polenta and beat to mix in.

Add most of the cheese to the polenta keeping back enough to sprinkle on the top of the soufflé. Mix well.

Beat the egg whites until very firm and white.

Fold into the polenta mix trying not to lose too much air about of the egg whites.

Turn into the greased dish and bake for about half an hour until risen and golden on top.

Serve immediately.


……….More Cheek!

04 Saturday Jan 2014

Posted by Nevenka in Main Courses, Techniques

≈ Leave a comment

Tags

baked eggs, ceps, Eggs, Mushrooms, Pork, pork cheek, rovellones, stews

Following on from the previous post, when you serve the Pork Cheek Stewed in White Wine with Wild Mushrooms remember to leave yourself a bit in the pan so that you can behave like a proper Bourgoine and treat yourself to Oeuf Murette or Baked Egg with Pork and Mushroom Gravy.

??????????????????????????????????

During the lunch where I served the Cheeky casserole, we were discussing the merits of this cut of meat, and my friend Jane recounted how she not eaten the cheek stewed before, but had been served it in a local restaurant, butterflied open and grilled. So I thought I would give it a try.IMG_0881

I slice the meat across to be able to open it like a book, and then gave each piece a good hammering with the smooth side of the meat tenderiser.

I then made a salt marinade by crushing a clove of garlic in the mortar with half a teaspoon of salt and a generous amount of freshly ground black pepper. Coat the meat in this and leave to further tenderise for several hours.

Grill and enjoy. It was super succulent and tasty.

IMG_0882

Yuca Dumplings

19 Tuesday Feb 2013

Posted by Nevenka in Techniques, Vegetable Dishes

≈ Leave a comment

Tags

Cassava, Fish Stew, Manioc, Yuca

Following on the theme of Ultramarinos – things from far away across the sea – I thought you would like the recipe for these little dumplings made from Yuca root. IMG_0027

Manihot Esculenta – Yuca, Cassava, Manioc, Mogo started to appear on the markets here about ten years ago with the arrival of Equadorians and Bolivians who came to work in Spain. It has been cultivated in Peru for more than 4,000 years and is more of a staple in South America than potatoes. Nowadays it is also grown extensively in Africa and Asia. It can be simply boiled and mashed, cut into fat fingers and fried like chips, or dried and ground into flours of various levels of fineness for making from cous cous style grains to sweet cakes.IMG_0017

The tapioca of school dinner infamy is made from Yuca – but don’t let that put you off from trying it in a different form. The chips I have to say I found dry and a bit hard, but do try them. The dumplings I love.  They have a firm slightly glutinous texture and a bit of sweetness. I love them with spicy curries instead of rice, with sweet and sour sauce as a vegetarian dish, and in soups, again because of the slight sweetness they fit better with a spicy soup.IMG_0019

I have totally forgotten where I came across this recipe, I am constantly collecting recipes and food ideas from magazines and newspapers, so it may well have come into my life that way, the original bit of paper now long lost but the method firmly locked into my memory.

Top and tail the yuca root and then peel it with a potato peeler. Wash it and then grate finely. This is easier done with a food processor.

There may be a thick fibrous thread in the centre of the root, discard this.IMG_0020

Take a handful of the grated root and squeeze it into a small cylinder. This may seem difficult at first, but with pressure and turning it in your hand the pulp will start to stick together.

Put the dumpling on a small square of tin foil and wrap it into a parcel. If you wanted to be truly authentic, then I suppose a banana leaf would be a better wrapper.

Do this with all the pulp.IMG_0025

Steam for 45 minutes. Let cool in the steamer.

Once they are cool enough to handle they can be unwrapped and used.

Any surplus dumplings will freeze well. I recommend taking them out of the tin foil to freeze them as the foil disintegrates in the freezer and leaves bits on the dumplings which is not very nice. You can tell that I am speaking from hard experience here.

Next post the Spicy Fish Stew with Yuca Dumplings illustrated below to whet your appetite.

IMG_0030

Sardines – How to descale and bone them

01 Saturday Sep 2012

Posted by Nevenka in Techniques

≈ Leave a comment

For those of you who have looked at the recipe for Sardines with a Pine Nut and Raisin Stuffing and thought – I haven’t the first idea of how to bone a sardine! – this is for you.

The scales on sardines are not at all sharp or well attached, they are more like thin plastic discs. To remove them, hold the fish by its head and with an ordinary eating knife that has not got a serrated blade, run the blade from the tail towards the head and this will detach the scales. Do this all over the fishes body until the scales are all loose. Wipe them off with kitchen roll, then rinse the fish to remove any remaining scales and wipe them dry. Wash your chopping board and the work area to remove any scales. They are a bit sticky and peskily adhere to your tools.

Now for the boning.

Cut the head off the fish and discard.

Tuck your fingers into the belly cavity and open the body along the underneath of the belly.

With you fingers prise the backbone away from the flesh along one side of the fish until you can open the fish out flat.

Then prise the backbone away from the flesh of the other side of the fish until it is only attached at the tail.

Cut the backbone off with a knife or scissors.

There will be a fin on one side of the fish that was below the stomach, cut this off and scrape away any guts.

If the fish are large then check whether there are any remaining bones and remove them.

Wipe the fish with kitchen roll. You are now ready to do your recipe.

Fresh Fig Tart

28 Tuesday Aug 2012

Posted by Nevenka in Starters, Sweet Things, Techniques

≈ Leave a comment

la_breva_green_eating_do_it_yourselfMy fig trees are behaving themselves this year. We planted four varieties – actually that is not strictly speaking true – we planted three varieties and another planted itself. It could not have worked out better though. The trees we planted were an early black variety called La Breva, which has a very early small crop in May, followed by its main crop of very sweet large fruit throughout the month of July going into August. As these come to an end the green figs start to ripen. One tree has large fruit for eating and the other smaller fruit for drying. The do-it-yourself tree crops from June to October with small black very sweet fruit that are good to eat or dry. I wish that I knew which variety it was then I could reccomend it.

The above description is how the trees are supposed to behave, but some years, depending on the weather, all the trees crop at the same time which makes quite a lot of work to deal with them.

The surplus Breva are made into Caramelised Fig Jam which is sold throught the farm shop and is very popular. The small figs are dried for the winter. As for the sun dried tomatoes, I use a fold out clothes drier with a sheet of mesh or fabric pegged to it to make a flat surface, and place it in a spot with all day sun and a breeze. Leave the figs whole and just place on the mesh. Bring them in at night so that they are not re-moistened by the dew. Turn them each day. I have problems with bugs getting in the green figs, but not the black ones. I think that this is because the end where the flower was on the green ones, it leaves a little hole that the bugs can use as an entrance. I am experimenting at the moment with stopping up this hole with a paste made from bread and water. I will report back on success or lack of it.fig_goat_cheese_Mint_salad

The fresh figs are complemented by anything salty, so are very good with Serrano Ham or salty cheese as in the above salad of Oak Leaved Lettuce, La Breva Figs, Goats Cheese, and Fresh Mint dressed with Basamic Syrup.

For eating as a sweet, try putting them into a tart.fig_tart

For a shallow 28 cm diameter tart tin

500 gms fresh figs

100 ml thick cream

3 large eggs

Fresh or bought puff pastry to line the tart tin

250 gms crema de almendras / 200 gms ground almonds and 50 gms sugar

This is a very quick and easy tart to prepare particularly if you are using bought puff pastry.

Preheat the oven to 180 C.

Roll out the pastry and lay out in the tart tin. You will see from my photos that I like to line the tart tin with baking parchment, it just makes it that little bit easier to slide the tart out of the tin.

Wash and dry the figs. Cut them into quarters. Arrange them on top of the pastry close together and in a pattern that pleases you.

Mix together the eggs, cream and almond cream or ground almonds and sugar.

When well amalgamated, spoon evenly over the figs. 

Bake for 1 hour at 180 C until golden brown. Let cool slightly before serving.

← Older posts

Create a free website or blog at WordPress.com.

Privacy & Cookies: This site uses cookies. By continuing to use this website, you agree to their use.
To find out more, including how to control cookies, see here: Cookie Policy
  • Follow Following
    • fincafood
    • Join 96 other followers
    • Already have a WordPress.com account? Log in now.
    • fincafood
    • Customize
    • Follow Following
    • Sign up
    • Log in
    • Report this content
    • View site in Reader
    • Manage subscriptions
    • Collapse this bar
 

Loading Comments...